Moto411, Moto 411

Wednesday, November 15, 2006

Part Review: ProGrip 717 Dual Compound SuperBike Grips

Quality: ++++-(4 out of 5)
Functionality: ++++-(4 out of 5)
Appearance: +++--(3 out of 5)
Value: ++++-(4 out of 5)
Overall: ++++-(4 out of 5)
Pros:
  • what vibration?
  • huge selection
  • ProGrip website lists grip lengths(!)
Cons:
  • ProGrip website is somewhat terse on other details (open-ended vs. close ended)
  • some styles are somewhat poseur-esque (that may be a positive for some of you)

Buy ProGrip grips at Amazon.com.

Introduction

Still wanting more from my previous attempt to find decent aftermarket grips, I decided to give ProGrip a try.

Appearance-wise, ProGrips are probably the antithesis of the Renthals. At the time of this writing, ProGrip has over 50 distinct styles utilizing single-, double- or even triple-rubber compounds in seven different categories (covering everything from jet skis to scooters). Due to the huge selection, and since I was ordering these online, this review is as much about my online shopping experience as it is about the grips themselves.

I started at the ProGrip website, which is a pretty daunting place. I had no idea their product offering was so vast. The website has multiple menus, sub-menus and sub-sub-menus, but, since I knew exactly what I was looking for, it was only moderately difficult to navigate to the motorbike grips section.1

To keep things simple, I limited myself to their "SUPER BK" section. Ultimately, I decided on the 717s partially because the grip pattern was similar to the Renthals (and I liked how those performed in that area) and also that they were among those most likely to fit my 2005 YZF-R6. The fact that they were the least obnoxious didn't hurt (I ordered the subtle black-gray color scheme).

Impression

Right away, I noticed a difference between the quality and substance of the ProGrips compared to the Renthals. They were definitely thicker and somewhat more supple. The black-gray theme was not nearly as offensive as I thought it would be based on the website pictures.

Installation

Since I had already removed my stock grips when I installed the Renthals (and since I didn't use grip glue), installation was a non-event. After I removed the safety wire, the Renthals slipped right off with a little compressed air and the 717s went right on with a little isopropyl. I applied new safety wire, waited a few hours for the isopropyl to evaporate, and I was good to go.2

Use

I have to say that, after my first hour-long ride with the ProGrips, I was very pleased. While the grips did transfer some vibration, it wasn't debilitating. Furthermore, they seemed just as grippy as the Renthals—which was the Renthals' one redeeming factor.

The true test was still to come. An hour-long road ride might be comparable to 20 minutes on the track, much less an entire day there. Seeing if the ProGrips provided continued comfort under more extreme riding conditions was the perfect excuse for a track test!

After giving them a spin at Thunderhill, I can honestly say that they did a job damping vibrations while providing comfortable grip, good throttle control, and just the right amount of front-end feedback. I didn't do a back-to-back comparison with the Renthals and my stock grips (which would have been the best method for comparison), but at this point, I almost don't feel it's necessary since this is the first time I've been clearly content with my grips.

Conclusion

I should acknowledge that evaluating motorcycle grips is highly subjective and rider personalities vary significantly. I've known motorcrossers-turned-roadracers who insist on using off-road grips on their race bikes. That's probably why it makes sense for ProGrip to offer as many styles as it does.

That being said, I think I'm finally happy with my own grip situation. Also, since I ride on the road as well as the track, reducing vibration while maintaining feel is important to me, but a competent racer using them exclusively for the track might have different demands (more feedback, lower cost of replacement, etc.). What I can tell you is that the ProGrips cost was pretty similar to that of the Renthals, but because they performed so much better for me, I feel like I got more bang for my buck. I would definitely recommend giving them a try.

1. I have to take this opportunity to express my dissatisfaction the ProGrip website. It relied too heavily on JavaScript and, personally, I hate it when JavaScript/Flash is a necessary part of navigation. One of the most detrimental side-effects of this approach is that I, as a consumer, can't copy the URL from my browser and e-mail it to bigpuss for a second opinion.

With website design, as a general rule, keep it simple. An elegant solution won't make a consumer think too much. Read Don't Make Me Think: A Common Sense Approach to Web Usability, and remember (as Mr. T would say) KISS: Keep It Simple Sucka.

2. bigpuss actually has perfected an approach using only compressed air to pull grips off and slide them on. Mastery of this approach allows almost immediate gratification since there is no isopropyl that must evaporate. I encourage you to experiment and find your own best method.

Monday, October 16, 2006

Part Review: CBR600 F4i Windscreens - Puig vs. Zero Gravity

Buy Puig windscreens at Amazon.com.

Introduction

It was less than 48 hours until we were supposed to be at the track and I needed a new windscreen. Okay, I wanted a new windscreen. Mine was scratched and old and, although I'm typically not one for vanity, the track day was mostly made up of Ducatis and I was bringing a Honda. I stopped at my local dealership to pick up a windscreen. (Normally I would order one online, but time was short.) They said they could order me a Zero Gravity windscreen and it would arrive the following morning, in time for my track day. Being familiar with Zero Gravity's product, I gave them the green light and headed to another dealership to cover my bases—just in case the "following morning" was actually next week. The alternate dealership had a Puig Racing windscreen in stock. Figuring a windscreen in hand was worth two the morning of the track day, I purchased the Puig as well.

I admit I wasn't familiar with Puig products, but seeing the windscreen in person before buying it put me at ease. The windscreen seemed well made, robust, and I liked the "bubble" form of the Racing series. I'm not a small person by any means and when you're on a 5-year-old 600 constantly going up against liter-bikes on the straightaway, any aerodynamic advantage—whether perceived or real—can help.

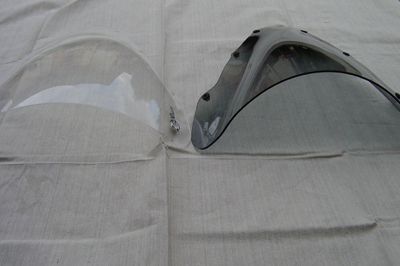
Puig (tinted) vs. Zero Gravity (clear):

Impression

Both were roughly $70 and both were easy to install. Each seem of good quality. However, I immediatly noticed a difference in material thickness betwen the two as can be seen below.

The Puig is clearly thicker:

Additionally, I liked the "bubble" on the Puig Racing windscreen. In all fairness, Zero Gravity does offer three different styles: the SR, Double Bubble, and Sport Touring. The "Double Bubble" is akin to Puig's Racing series and the "SR" is akin to Puig's "Standard" series. Given that the Puig screen is made with thicker material and you get the "bubble" for the same price as Zero Gravity's standard SR model, I was happier with my Puig purchase.


Installation

Installation was simple, straightforward, and the same on both screens.

Use

Figuring the Zero Gravity would be very similar to my stock windscreen, I used the Puig at the track. Overall, it performed very well...how can a windscreen really perform badly unless it cracks or flies off? I really liked the racing bubble profile. I'm sure it was a total placebo, but I couldn't attribute making time on 1000cc Ducatis on the straightaway to anything else as I know it wasn't rider skill.

It's worth noting that I have no long-term results yet. I don't know how each responds to prolonged sun exposure, repeated cleaning, abuse at track days, or a crash. I will update my review when I start getting that kind of data.

Conclusion

If I had to return one of the windscreens, I would return the Zero Gravity. Of course I will continue to use both and log future observations.

Gear Review: Helimot Gloves

Quality: ++++-(4 out of 5)
Functionality: +++++(5 out of 5)
Appearance: +++--(3 out of 5)
Value: +++--(3 out of 5)
Overall: ++++-(4 out of 5)
Pros:
  • Extremely comfortable
  • Custom tailored fit
  • Quality Workmanship
  • Kangaroo
  • Locally made (for me anyway)
Cons:
  • Not cheap
  • Styling might not be for everyone

Introduction

I knew I needed a new pair of gloves soon, but I really hadn't given any thought to what I was going to get. My multiple pairs were getting too worn, coming unstitched, soaked by sweat at the track only to dry hard in the sun too many times, etc.

I wasn't really putting off buying new gloves, but gloves didn't really excite me. I'm pretty sure this was due to the fact that I've never had a pair I really liked. I've never experienced the comfort of what a motorcycle glove could and should be. Mine typically start to bunch in the palm, cut off circulation to my pinky finger, have one or two fingers that are too long, etc. Even "good" gloves (which I'm pretty sure just means "expensive") haven't been any better. However, as a disclaimer, I've never owned any really good/expensive gloves.

Well, a couple weekends ago, I found myself at a silent auction raising money for a local fire department which helps quite a few motorcyclists in need. Staring me in the face was a nice looking pair of gloves from a brand I had heard was pretty good. I placed my $130 bid and left for the day. I got the call last Monday that I had won the gloves. I was really excited; new gloves on the cheap! The gloves on which I bid were sent to me and all I had to do was go to the local shop and exchange them for something my size. Luckily for me, the Helimot shop is literally walking distance from my house...so off I went.

Impression

Glove at first sight! When I slipped into my new gloves at the shop, it was a life-changing event. Motorcycle gloves can be comfortable! (In fact, I'm typing in them right now.) Nothing poked my hand; nothing felt rough or hard; it was all smooth and soft; and, most importantly, the gloves barely limited my digital dexterity. The only things a bit off were the thumbs and two fingers—I have short fingers and they were too long. I was told to go break them in with a few rides and bring them back to be tailored to my finger length. I was in shock! Now, the alterations do cost $7 a finger, but considering I got a $200+ pair of gloves for $130, the few bucks for alterations seemed like a good deal.

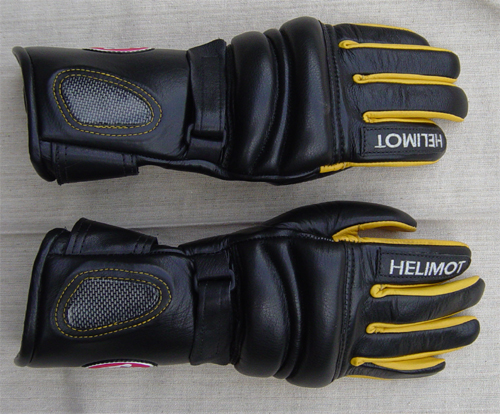
The best gloves I've ever owned:


The palms are soft and flexible kangaroo hide without superfluous material and the seams are in out-of-the-way places. Compare the palm of the Helimot glove above with an old glove of mine below. The glove below has all sorts of who-knows-what going on. All that material and all that stitching kept bunching up to make a horribly uncomfortable and sometimes painful lump. The Helimot gloves don't do that. But what about safety? The entire palms of the Helimot gloves are two layers thick, and yet they still retain the flexibility you need in a motorcycle glove.

Old, bad glove:

Although they may not look it, the Helimot gloves offer superior protection throughout. The padding on top is thick, yet flexible and, despite it not having carbon fiber knuckle protectors, I suspect these would do a better job at protecting one's hands in an accident. The soft padding does give the glove a sort of "Darth Vader" look which some may not like. I happen to really like the styling of the glove. And believe me, you will get over your style concerns if you try them on. To visually highlight what I mean, compare the inside of the old glove with the Helimot.

Old glove:

Hand heaven:

Use

I'm a few rides in and they're still great. I'm going to bring them in for the alterations soon; they should be even better when I get them back.

Conclusion

Good gloves are worth the money, as long as you are actually spending your money on good gloves. The Helimot gloves I got were less expensive than top-of-the-line gloves from more mainstream brands and far more comfortable. Even after the custom alterations, the price will still be comparable. Not all expensive gloves are good, but these are thus far.

Part Review: Gilles Rearsets 2001 CBR600 F4i

Quality: ++++-(4 out of 5)
Functionality: ++++-(4 out of 5)
Appearance: +++++(5 out of 5)
Value: +++--(3 out of 5)
Overall: ++++-(4 out of 5)
Pros:
  • Solves stock F4i rearset "problem"
  • Great feel, good grip, smooth shifting
  • Excellent craftsmanship
  • Are they not hot?
  • Replacement parts sold individually
Cons:
  • Not cheap
  • Not cheap at all

Buy Gilles rearsets at Amazon.com.

Introduction

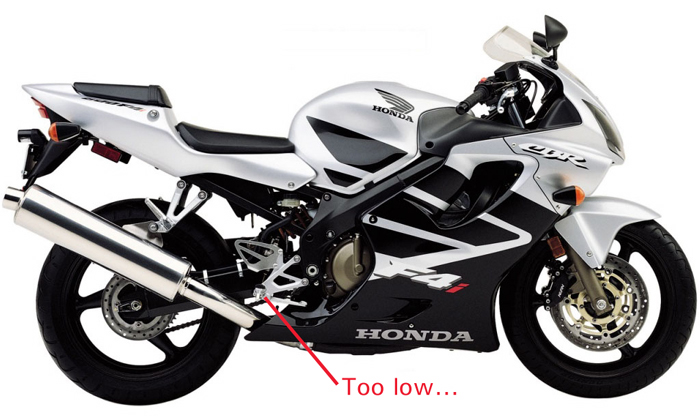
Anyone who owns a Honda CBR600 F4i knows the bike, save the seat, is extremely comfortable given its above average handling capabilities. That comfort comes at a cost though; for any aggressive riding, the foot pegs are far too low.

Seen here, the stock F4i rearsets are too low:

This can lead to a serious medical condition known as Toeis Nomoreis. If Toeis Nomoreis is allowed to progress, the cost in footwear alone can be exorbitant.

A bad case of Toeis Nomoreis:

The only thing that could solve my problem was a pair of aftermarket rearsets. I took lugnut's advice, read his review and ordered some Gilles rearsets.

Impression

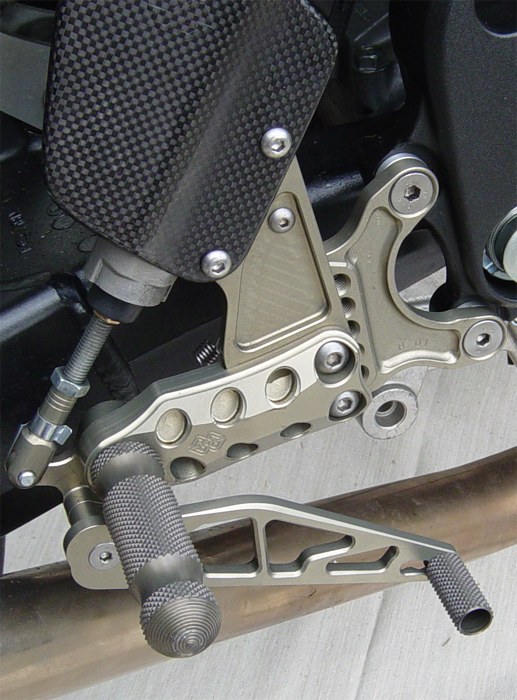
Wow! lugnut was right. The rearsets continued to impress me from the time I got the box until long after I hit the road. Lucky for lugnut everything he reported was dead on, as I know where he lives. I liked the black ones lugnut chose, but I went with the "titanium" color to match my bike.

Right side:

Left side:

Installation

Installation was simple and straightforward. Unlike with lugnut's R6, the F4i rearsets did not require any creative shift linkages. However, when purchasing the rearsets, I had to explicitly decide between standard or inverted shifting.

Use

Having sat on lugnut's bike when he had his Vortex rearsets, I was worried about grip on an aftermarket foot peg. I was pleasantly surprised with the Gilles pegs. Fantastic grip, smooth shifting and, best of all, my Toeis Nomoreis has been cured.

Conclusion

True, they are expensive, but find me some quality aftermarket rearsets that aren't. Given the price, I could have lived without them if my stock rearsets weren't so low. But, due to the problems with my boots, these were a necessity. For the F4i, I think the Gilles rearsets represent a good solution for riders encountering similar issues.

Tuesday, August 29, 2006

B/S Alert: Exotic Sportbikes

We're starting a new type of commentary with this post: the buyer/seller (B/S) Alert. Specifically, we will use these to convey unacceptable interactions with various business entities in the industry.

Recently, an Öhlins SD-121 happened to come into my possession. The only catch was that it was missing the standard bracket (and bolts and ball joint). Finding replacement parts has been difficult at best.

The "missing piece" from my "big Ö":

Imagine the swell of hope I experienced when I found Exotic Sportbikes whose front page reads, "Exotic Sportbike carries all lines of motorcycle parts, accessories and apparel. We can get you anything you need for your sport bike, even if it's not on our site! [emphasis added]" Furthering my assumption that I found the solution to my problem, I read through their Öhlins steeing damper page which notes, "[Exotic Sportbikes] only sells official Ohlins Steering Dampers with Genuine Ohlins Mounting Kits, not the cheap imitations that some of our unscrupulous competitors sell."

I didn't even realize there were "gray market" Öhlins steering dampers, much less that they were cheap and that one had to be unscrupulous to deal in them. Exotic Sportbikes' page went on to explain the differences, such as, "If your [gray market] Ohlins Steering Damper ever needs repairs the parts can be extremely difficult, if not impossible to get." They even had an entirely separate page explaining "how gray market Ohlins Steering Dampers can be dangerous".

I immediately sent an e-mail describing my situation (with the above picture attached so there wouldn't be any confusion):

To: Sales@ExoticSportbike.com
From: [snipped]
Subject:
Date: Mon, 28 Aug 2006 23:31:31
    -0700

I was looking at your Ohlins
page:

http://...

I have a SD-121 but I am missing
the bracket:

[picture]

I believe the bracket itself is
Ohlins part number 02252-01, but
I am also missing the ball joint,
screws, etc. Is there any chance
I can order one of these full
assemblies through you guys? If
so, how much does one cost?
Thanks!

...

I received a terse response:

From: "Sales@ExoticSportbike"
    <Sales@ExoticSportbike.com>
To: [snipped]
Subject: Re:
Date: Tue, 29 Aug 2006 14:42:51
    -0400

Sorry we do not have it.

I wrote back and pointed out the irony of publishing claims that they could get any part and that one shouldn't buy "gray market" Öhlins steering dampers lest one not be able to get replacement parts when they couldn't actually get replacement parts for my "official" Öhlins steering damper despite them being and "official" reseller. To which I received a short inquiry:

From: Sales@ExoticSportbike.com
Subject: Re: Re:
Date: August 29, 2006 12:08:08
    PDT
To: [snipped]

Did you order the damper from
us? What name was the order
under and I will look it up.

Ride Safe,
Mike

While I always appreciate a reminder to be safe on two wheels, I wasn't sure how the question posed was relevant. If they couldn't get parts, they couldn't get parts.

I don't have much patience for corporations who attempt to scare consumers into paying inflated prices on artificially-limited goods. Especially for those who—when the deception is no longer profitable—are quick to abandon customers who (literally) bought into the fear. While I suspect the copy on their Öhlins pages comes from Parts Unlimited or Öhlins itself, they still proliferate the message and benefit from it.

Sunday, August 27, 2006

Part Review: Renthal Road Race Grips

Quality: +++--(3 out of 5)
Functionality: ++---(2 out of 5)
Appearance: ++---(2 out of 5)
Value: +++--(3 out of 5)
Overall: ++---(2 out of 5)
Pros:
  • grippy
  • if you buy these, you get exactly what Jamie Hacking gets
Cons:
  • might as well be painted on based on how much vibration they communicate
  • use limited to one crash only

Introduction

The stock grips on most sportbikes are notoriously hard and slippery. The manufacturer of your particular model may be dealing with vibration issues in the 8,000 - 10,000 RPM range for a third straight year, but unfortunately, you don't get a free upgrade when (if!) they finally address the problem. Stock grips don't do much to insulate you from the idiosyncratic oscillations of all those moving parts underneath you. Aftermarket grips are often an inexpensive way to incrementally improve ergonomics and put some distance between your hands and your drive train.

I decided to replace the stock grips on my 2005 R6 with a pair of Renthal medium-compound Road Race grips. My decision was based partly on my noticing that (soft-compound) Renthals were used on the Graves Motorsports bikes (and I figured Graves and Jamie Hacking knew what they were doing). I opted for the medium compound in the hopes that they would hold up a little better (I wasn't interested in replacing them after every track day).

Impression

The grips were a little thinner than the stock ones on my R6. The diamond grip looked...well...grippy. There's nothing that really stood out about Renthal's Road Race grips, and I liked that. I didn't care if they were cute or if they had three-color, multi-compound inlays; I just wanted them to work.

Yup, it's a grip:

Installation

The hardest part of installing aftermarket grips is getting the stock ones off. They are usually glued on by a professional gluer who more often than not really knows what he or she is doing. I find the best results for stock grip removal usually come from an iterative use of a small flat-head screwdriver, and air compressor (optional, but very helpful), some silicone spray and a lot of elbow grease.

First, I slip the screwdriver underneath stock grip and try to pry the rubber away from the bar (or throttle). I'll sweep around and around until I get about 0.5" in all the way around. Then I will use compressed air to try to separate the grip further. Between attempts with the air, I'll shove the straw from my silicone spray as far in as I can and apply a liberal amount of the spray. Then I wrench the grip back and forth with my hands to see how much of the glue I can break loose. I keep repeating this until I can pull the grip off. The silicone is a necessity (for me anyway), since it eliminates me fighting with the natural friction between the rubber and the bar and makes it easier to apply my efforts solely to the glue. bigpuss says that in a pinch, you can use WD-40 instead of silicone spray, but I find that silicone spray is easier to clean off if you ever intend to use the grips again (you do not want them to be lubed with anything that won't evaporate quickly when they go on).

I should mention that whenever I put grips on, I don't use grip glue. I find that if I clean the inner portion of the grip and use some isopropyl (rubbing alcohol) as temporary lubricant to get them into position, safety wire and the grips' natural friction is plenty to keep them from moving around. Your mileage may vary however.

The packaging is a little more exciting:

Use

Right away I was impressed by the control. These grips were definitely a lot grippier than stock and I didn't have to squeeze nearly as much to be able to twist the throttle.

Almost immediately thereafter, however, I noticed an odd buzzing sensation in my fingers and hands. After about an hour on the rode, my hands were numb (which was unusual for me). The '05 R6 tended to exhibit some "interesting" vibrations inside of certain RPM ranges. Unfortunately, these seemed to be where I spent most of my time on the road. This may have been exaggerated by the fact that I had replaced my stock bar end weights with aftermarket Delron ones (which weight far less).

On the track I hardly noticed the vibration at all, but I was only out for (at most) 20 minutes at a time. I wouldn't be able to guarantee I would be as happy after 45 minutes.

I had an...uh...opportunity to see how they held up in a crash when I low-sided at Willow Springs and I have to say these are pretty delicate in the face of adversity in the form of tarmac and gravel. The crash-side grip was torn away from the throttle which was doubly impressive considering the end of the bar was protected by my bar ends. All I can say is that when you crash, everything seems to come in contact with dirt and rocks in one way or another.

Conclusion

I can't say I'd get these again. While they certainly improved my grip, they put me a little too close to my engine vibrations for my tastes. That might be improved by moving to the softer compound, but I'm fearful that those will hold up even less well. For now, I'll keep looking for something better.

Thursday, August 03, 2006

Christopher Matthews On The US MotoGP

Christopher Matthews has written a surprisingly scathing review of the US MotoGP. We found it to be pretty informative and think you will too.

Sunday, July 09, 2006

Part Review: Gilles Rearsets

Quality:++++-(4 out of 5)
Functionality:++++-(4 out of 5)
Appearance:+++++(5 out of 5)
Value:++---(2 out of 5)
Overall:++++-(4 out of 5)
Pros:
  • very purty
  • extremely durable
  • oh so pretty
  • lots of adjustability
  • did we mention they look good?
Cons:
  • not exactly cheap
  • replacement parts are pricey
  • shift linkage is non-standard (on the 03-05 R6)

Buy Gilles rearsets at Amazon.com.

Introduction

After having some mediocre experiences with Vortex rearsets on my 2005 YZF-R6, I decided to investigate alternatives. Still being interested in ergonomic adjustability, I was naturally attracted to Gilles (okay, so I was attracted to Gilles because they looked good and 58cycle carried them for about US$100 below list, but after seeing they were adjustable too, I decided to give them a shot).

Impression

I was impressed as soon as I opened the box (which was pretty too, I might add). First, the rearsets arrived almost completely assembled (except for the shift rod) and were attached to a display rod much like those one would see in display cases at shops and trade shows). Second, even in the understated black annodized finish, these were just plain nice to look at. I spent about fifteen minutes holding them up and admiring them before even looking at the instructions.

One surprise for me were the footpegs. All the photos I had seen were shot at a downward angle showing only the tops of the pegs. I was under the impression that these were solid cylinders, when in fact they had less material then I realized. This caused some concern as I wondered how they would hold up in a crash.

Also, the diamond-knurled pattern was sharp. While I was sure this aided with grip, I couldn't help but notice that one could not touch these to anything fibrous (like a t-shirt or napkin) without having it claim a few bits for its own. Everything stuck to these things. I didn't want to imagine what would happen if I dragged a bare knuckle or two across them.

Installation

Most of the literature that came with the rearsets was in German. I don't speak German, much less read it, but that was okay since what little English there was covered any questions I had regarding installation. The nice part was the instructions had just enough pictures which were much more valuable than words for this kind of thing anyway.

You might be wondering why one would need instructions to install rearsets. After all, doesn't one just remove the stock ones and bolt on the aftermarket ones? In most cases that is true, but the Gilles rearsets for the 2005 YZF-R6 have a non-standard, dual-rod shifter linkage. While this looks like an overly-creative way to allow for both standard and GP shift patterns without messing with the shift arm, it probably also has the added benefit of allowing Gilles to keep more standard components—like the pedals and mounts—and to make adapter parts for each bike.

The only downside to this approach that I can see is it doesn't make for very much space on the aft side of the frame for a quick-shifter. I haven't attempted to install one using these rearsets, but I would imagine that it limits one's options. Any quick shifter that can be installed on the forward side of the shift rod is probably still okay.

The rearsets also came with a mount for the stock brake light switch as well as a spring to both activate the stock switch, as well as act as an—albeit somewhat weak—return spring for the brake lever.

Adjusting the foot position is fairly straightforward and requires the removal of two bolts on either side, provided one stays within the same column of adjustment. However, to keep the same pedal angle when one strays outside of that column, one might have to reposition where the intermediate shift rod attaches to the pedal, or—at the very least—make a less dramatic adjustment using the main shift rod.

I noticed when I used the adjustment position that is lowest and furthest back, the brake pedal came within a millimeter or two of my exhaust pipe. It didn't touch, but the distance made me a little nervous. Grabbing (with gloved hands, of course) and tugging on the pegs showed very little flex, and it took quite a bit of force to get the pedal to come in contact with the pipe.

Use

On both the street and the track, these were quite nice. My feet stayed planted and I could always tell where the ends of the pegs were. Shifting didn't feel strange even with the change in linkage. There was no rear brake drag and the pedals were easy to operate. I had absolutely no complaints while riding.

Conclusion

There are no two ways around the fact that these are expensive. Finding a place that sells them at a discount helps, but it is still quite a bit of money to spend. That being said, if you're in the market for rearsets because you're dragging your stock pegs or want better ergonomics, I would highly recommend considering these. You'll get one of the best rearset products currently in production. Not to mention—as some of my tosser friends might say—they look the absolute business!


Update (2006-07-09)

After low-siding at Willow Springs, I can say I am even more impressed by these rearsets. I slid on my right side for about 30 feet across the track surface, and then another 20-30 feet in the run-off area and the right-side rearset looked almost new when I picked the bike up again. The only damage was on the foot peg which—despite losing several millimeters of material on then end—was still straight.

The damage incurred by my right-side foot peg during a low-side at Willow Springs:

A close-up:

I checked around and nearly every retailer who sold Gilles rearsets also sold replacement parts, including new footpegs. A new footpeg was about US$28, but I decided against replacing it, since there wasn't anything functionally wrong with the one I still had.

My post-crash clutch-protector...:

...and right-side frame-slider (both turned upwards) for perspective:

Saturday, June 17, 2006

Part Review: Vortex Rearsets

Quality:++---(2 out of 5)
Functionality:++---(2 out of 5)
Appearance:+++--(3 out of 5)
Value:+++--(3 out of 5)
Overall:++- --(2 out of 5)
Pros:
  • cheap(er than most other rearsets)
  • lots of adjustability
Cons:
  • susceptible to damage in a tip-over
  • replacement parts are pricey
  • can't feel the ends of the pegs
  • no brake light switch
  • tends to drag the rear brake

Introduction

One of the problems with some stock rearsets is that they tend to drag at full lean. For a neophite rider like myself, this can be quite unnerving (especially if they catch). I decided to replace the stock set on my 2005 YZF-R6 with something a little more track-friendly. One of the features I desired in aftermarket rearsets was adjustability (probably because I'm not good enough to know exactly where I want my feet to be).

I also tend to be pretty price conscious. Apparently there is a severe shortage of materials and manufacturing options in the motorcycle components market, since I can get an entire 5.5 HP, 2220 Watt generator for less than what I would pay for a few ounces of milled (and maybe annodized) aluminum and some bolts.

Given my options, I was drawn to the Vortex rearsets for their apparent adjustability and the fact that they were about US$100 cheaper than similar offerings.

Impression

Vortex products usually leave me feeling mildly blasé: they're nothing spectacular, but not junk either. These rearsets were no exception.

Installation

Installation was fairly obvious. One thing that was strange to me was the replacement of the stock shift rod. Use of the Vortex rod was necessary since these rearsets use a different thread size on the shift pedal. I'm not sure why they didn't just make it the same size thread and use the stock rod, but I'm sure they have their reasons.

For laughs, I initially installed them with a GP shift pattern. I had never used that pattern before and I wanted to see how difficult it was to change the configuration back and forth with these rearsets. It was relatively simple and required relocating the shift rod outside the frame and swapping the orientation of the shift arm. No additional parts were needed.

Installation of these rearsets necessitates the removal of the rear brake light switch. I wasn't too worried about this since I almost never use my rear brake exclusively, but the fact that Vortex did not make a solution available (even as an optional component) was irksome. Another troublesome matter was that there was no external spring on the brake pedal. It relied entirely on the rear master cylinder to return to a neutral position.

Setting the footpeg positions were easy and minor adjustments could be made quickly.

Use

Once I got my feet positioned close to where I wanted them, riding up and down my block for the first time was a natural experience (aside from the change in shift pattern).

One thing that was bothersome was the "sponginess" of the rear brake. With no additional spring to return the brake pedal to neutral, the resistance from the master cylinder was not enough on its own and gave me the odd feeling that the brake lever was constantly in a different position every time I went for it. Although this was probably more psychological than anything else, Vortex had no solution, so I spent nearly $30 to order another manufacturer's fix.

A few quick rides told me that a GP shift pattern was not in the cards for me (at least not at this time). Heck, if Mat Mladin can win six AMA Superbike championships with a standard shift pattern, I figure it's good enough for me.

At a track day at Willow Springs, other issues came to light. Although the footpegs were knurled with a small diamond pattern, I had a hard with the feel. As I would attempt to set up for a corner, I would move the ball of my foot back to sit on the rear peg, but often wouldn't quite know exactly where on the peg I was. For a better rider, this may not have been an issue, but for me, this was distracting (especially when my foot would slide off the end).

While in the pits, I had a slight mishap when I grabbed too much front brake while pulling a U-turn to our tent. I lost my balance and dropped my bike on its right side. One of the points to hit was the footpeg. At first, I didn't notice any immediate damage (other than a few very small scuffs from the hard pavement), but when I removed the footpeg for a closer inspection, I noticed the bolt that held it in place was bent. It seemed improbable to me that a small tip-over could have caused this, but I couldn't think of anything else to which to attribute it.

At the end of the track day, I noticed a gritty feel when I tried to shift. I'm not sure how, but apparently dirt had made its way into the bearings on the shift pedal. While I doubted they would seize up right away, I wasn't about to take a chance the next time I went out on the track, so when I got home, I ordered a replacement set. The cost? US$28.84 plus shipping. Ouch! How often was I going to need these?

Conclusion

While I think these are probably adequate for the street, I would think twice about getting these for serious track use. First, don't even think about buying these without also purchasing the Graves return spring (and by the time you make that purchase, you're probably in the ball-park of the cost of a superior product). Second, if you're like me, you're likely to find your self paying attention to your footwork rather than your lines. Third, if you crash, you're probably going to be buying a new set, since it will likely cost less than the required repair. All in all, I can't recommend these even to bargain hunters. I'd say spend the few extra dollars and get yourself something a little more robust and well-designed.


Update (2006-06-17)

Vortex has changed their footpeg design, my guess is as a result of feedback from riders. I have not tried them, but based on the appearance of the changes, I would say they probably address my issues with footpeg feel.

Sunday, May 07, 2006

Vendor Review: 58cycle

Selection:+++--(3 out of 5)
Expert Knowledge:++++-(4 out of 5)
Ease Of Use:++++-(4 out of 5)
Service:+++--(3 out of 5)
Pricing:++++-(4 out of 5)
Overall:++++-(4 out of 5)
Pros:
  • excellent prices
  • knowledgeable staff
  • free shipping
  • wish list feature available with account
Cons:
  • some product listings lack pictures/information
  • limited brand selection

Discovery

Finding 58cycle was a complete accident. I was looking for a rather exotic Termignoni exhaust for my 2005 YZF-R6 one day when I stumbled upon an Ebay listing. After getting over my initial sticker shock for the Termignoni, and my disappointment that I wouldn't be owning one anytime soon, I started digging around that seller's other listings and after a short while, came to learn of that seller's external website.

Those who know me know how much I love to profess my disdain for Ebay. My sense is that it is a community of frauds and liers and morons who spend countless hours and dollars making the shareholders of Ebay and UPS very rich. All of this is perpetuated by disproportionately positive water cooler anecdotes about great deals to be found without any mention of the work required to find them or the vast number of feedback hostage situations quietly resolved with, "AAA++++ GREAT EBAYER!!!!". That being said, it is a great research tool for estimating the market value or availability of certain commodities (like bike parts). Oh yeah, and it's great for fencing stolen goods. But if a seller has an item for sale on Ebay and his own separate site, I will almost always prefer the latter.

The Termignoni might have been off the table, but I noticed that 58cycle was not only one of the few US-based Termignoni resellers to make that exhaust available, but it also had some pretty darn good prices on other, more accessible parts. So I bookmarked the site to perhaps return on a rainy day (or at least one on which I had more disposable income).

Well that day soon arrived and I had my first opportunity to make a purchase. However, if it weren't for 58cycle's Ebay listings, I probably never would have found them. They aren't among the usual suspects when doing a Froogle or Yahoo! Shopping search, and I don't believe I've ever seen them advertise anywhere.

Presentation

I initially researched two applications for our Gilles rearsets purchase: my 2005 YZF-R6 and bigpuss's 2001 CBR-600F4i. 58cycle did not offer the absolute lowest price we could find, but they were within a few dollars. They also offered free shipping on orders more than US$100.

We had never seen Gilles rearsets in person before making this purchase. 58cycle's product listing for the R6 had two small photos depicting only the left-side rearset in the Titanium and Black finishes respectively. The product listing for the F4i had one larger photo of the Titanium finish. While they looked tempting in these displays, we wanted something a bit more detailed before committing to such a large purchase. Thankfully, both Google and Yahoo! image searches provided plenty of sufficient visuals. However, it would have been nice to have access to such detail at the point of purchase.

There was some initial confusion resulting from 58cycle's product pages. First, finding the products took some time, as 58cycle's search feature, although more forgiving than most we've found (since it does substring matching by default), was a bit hit-or-miss. For example, a search on their site with the terms "yzf gilles" didn't turn up any results, but "r6 gilles" had about 14 hits, including other Gilles products and other bikes like the Suzuki GSX-R600. Trying to narrow the results using "r6 gilles rearsets" got nothing, but "r6 gilles rear set" yielded three results, one for each different R6 body type.

Second, we were able to find one listing appropriate to our R6 entitled "2003-2005 Yamaha R6 Fully Adjustable Gilles Racing Rear Sets", but when researching our F4i, we found two applicable listings: "2001-2002 Honda CBR 600 F4i Fully Adjustable Gilles Racing Rear Sets" and "2001-2005 Honda CBR 600 F4i Fully Adjustable Gilles Racing Rear Sets - Not Reverse Shift". The only differences between the two F4i product pages (including the photos and the price) were the titles and a note on the latter indicating, "These Gilles Rear Sets are not Reverse Shift Capable." Was the first capable of both? Was there something different about it that it could only be installed on a 2001-2002? We weren't sure.

Additional research into other sources enlightened us that the R6 rearsets were capable of both regular and GP shift patterns depending on their installation, but the F4i rearsets were fixed (i.e., one had to commit to a single shift pattern at the time of purchase). Also, either of the F4i rearsets would fit all years and one was not limited to 2001-2002 for the GP shift pattern.

One feature of 58cycle's website that sets it apart from most others is its wish list. Its use requires that you either have or create an account, but it was extremely convenient both in our research of rearsets as well as the ability to conveniently save other goodies we might have happened across.

Service

In the process of researching rearsets, I figured I'd e-mail 58cycle's customer service <info@58cycle.com> to ask for clarification on the features and years for the two Honda listings. For fun, I also threw in a question to see if Termignoni made a slip-on version of their Bel Grada full system. Days passed and I received no reply. I resent the e-mail and again suffered no response. I kept a watchful eye on my spam folder in case responses were sent, but sucked into the abyss before I had a chance to read them. Still nothing.

Eventually I called them up (their phone number is listed on their site). I spoke with a woman who's name I can no longer recall. I asked about the Termignoni, the rearsets and some other gadgets I had been eyeing. I quickly felt like I might have caught her just after she spilled coffee on her keyboard or something since her patience for my seemingly endless barrage of questions was appearing to wear thin. Although she wasn't the friendliest person on the planet, she was extremely knowledgeable about the products 58cycle carried. She (not-so-carefully) explained that she was not aware that Termignoni made a slip-on version of the Bel Grada system, but even if they did, it was not likely to be imported into the United States. She quickly verified our independent research regarding the Honda rearsets and picked off my other challenges like Ken Jennings. She never once tried to end the call early or encourage me to find answers elsewhere.

Acquisition

Checking out was easy. What was really nice was the ability to get a shipping cost estimate without having to provide a credit card number. For some reason, it always makes me uneasy when sites ask for my payment information before they tell me what the total will be, so it was nice to see 58cycle does The Right Thing™. Another courtesy 58cycle provides is the ability to check out without having to create a customer account. We decided to create one anyway, since it was necessary to use the wish list feature.

Our total cost for the transaction was US$448.95. After the order was placed, the rearsets arrived in about a week and in perfect condition.

Conclusion

I don't know much about the people behind 58cycle. My impression is that it is a small mom-and-pop shop that is technologically advanced for its size and is run by dedicated, hard-working folks. Their prices can be beat, but not by much, and the free shipping for orders of a certain size can really seal the deal for bargain hunters. Overall, I would say my experience was pleasant, the overall value was excellent, and I intend to return (if only to get a few more things in my wish list).

Sunday, April 09, 2006

Part Review: Graves Rear Brake Return Spring

Quality:++---(2 out of 5)
Functionality:+++++(5 out of 5)
Appearance:+++--(3 out of 5)
Value:+----(1 out of 5)
Overall:++- --(2 out of 5)
Pros:
  • gets the job done (period)
Cons:
  • oh-my-god expensive for what you get

Introduction

After installing a set of Vortex rearsets on my 2005 YZF-R6, I was experiencing a problem with the return of the rear brake pedal. I hunted around for a solution and ultimately found Graves Motorsports' rear brake return spring.

Impression

When I opened the bubble mailer to reveal what I had purchased, I actually asked myself aloud, "that's it?" I was tempted to hold the envelope upside down and shake it just to make sure I wasn't missing something, but I wasn't. The package consisted of a packing slip, a spring and a small threaded mounting plate whose diameter was just larger than the spring's. My next question to myself was, "I paid what for this thing?"

The satin titanium-look finish on the plate was nice, but it was clear this was not a precision-milled part. The threaded hole was not centered and the hex end was somewhat lopsided. Maybe I just got a bad one, but it didn't look like much care went into actually making this thing.

Installation

Installation was trivial. No instructions were necessary even without having a photo handy. Just unscrew the master cylinder pedal joint and locking nut, slip on the spring, screw on the spring plate in place of the locking nut and screw the joint back on (pocket the nut in case you ever want to return it to the stock setup). The finish on the plate is almost identical to the finish on the joint, so after it's installed one is tempted to think that these are all stock parts. This led me to wonder why Yamaha doesn't make their rear master cylinder assemblies like this in the first place.

Use

It fixed my probem, clean and simple. My brake pedal now eagerly returned to a neutral position when I relinquished pressure.

Conclusion

I suspect Vortex rearsets aren't the only ones to suffer from this problem (after all, Graves makes rearsets too), so I'm sure there's a demand for this product, but I am severly unimpressed by the cost. That being said, it just works. How many modern devices can we say that about? I say if you need it, get it, unless you can find something cheaper.

Sunday, March 26, 2006

Welcome to Moto411!

We want to invite you to share in our experiences on our motorcycles. We will post our reviews of bikes, parts, events, laws, policies and anything else remotely related to motorcycling for the benefit of all who will engage. We sincerely hope you will join us and contribute to the conversation.

About Us

We are a small group of riders based in Central California in the United States. We all share a share a few fundamental commonalities. We love to ride. We love to explore. We try to improve and we know there is much room for all of us to do so. We are self-effacing. We value knowledge, humor, individuality, privacy, freedom and the respect of our fellow human beings. We have faith that most people in this world, no matter what their background, are hard working, honest folks who just want to be able to support their families and grow themselves personally. We stand with them. We hope you will too.