Moto411, Moto 411

Monday, August 20, 2007

The Racing Experience Part 5: Race Three

At the end of our last race, we decided that, although I was not at all fast, the times showed that if I hadn't gone straight to the back of the pack when the green flag dropped, it would have significantly changed the outcome—especially factoring in my last-lap tire issues.

Third Race Goals and Expectations

New tires, new chain, new sprockets! First, and most importantly, we have fresh rubber and four sessions to get it scuffed in. Not only was this great for grip, but great for my confidence level (remember, the goal this first year was to not lay the bike down at all). Next, we dropped a tooth in the front and added one in the back and moved to a 520 chain (the lighter chain reduces weight and lets the engine pull on the wheel instead of using its energy moving the heavy stock chain). The F4i didn't become a wheelie machine, but when you're competing against 2006/2007 600 machines on a 6-year-old bike, it is a giant improvement. Furthermore, on a track like Infineon with no long straightaways, any top-speed concerns were non-existent.

First things first. New Dunlop 208s are slippery—especially when your practice/qualifying group is first on the track after a night of fog and condensation. I spent the first of four sessions slipping around the track at moderate speed to a) do my part in drying out the racing line and b) start to scrub in the tires. Most importantly, I took the opportunity of the predictable track sliding to play with throttle and controlling the slide. Although I would have preferred to be putting in some hot laps, working on slide control at slower speeds was very helpful and increased my comfort level for later. The downside was that with the new gearing, I wasn't sure how much the increased torque would affect my previous habits of just laying on the throttle whenever I felt like it.

By the second session, the track had dried out and I was focusing on the most important things...

By the second session the track was warm and dry and I was back at work trying to look better for the photographer.

During the second session, I had to admit that I just wasn't feeling it. My times weren't that bad (for me as compared to last time anyway), but I expected more considering the changes we made to the bike. I was very disappointed in myself and my performance. By the third session I hadn't improved over my last race times and I had no excuse as to why. The bike launched out of the corners faster than before and the tires had great grip—I should have been going quite a bit faster than last race day. I knew why... my lines weren't tight, I was braking lazily and I certainly didn't have the eye of the tiger that day.

No one else looks this good going this slow—most people have to go much faster!

New Gearing

I would like to blame it on getting used to the new gearing, but to put it short, the bike felt great. I was being far too nervous in adapting to the changes and not taking advantage of them. It was still an almost stock 2001 F4i and it had new tires—it will grip almost no matter what—but the goal of not laying it down just wouldn't let me trust.

I started getting back into it and, although still not going faster than last race, I was passing plenty of people during practice. I was gridded about mid-pack and was looking forward to the race—especially the start. I had been practicing my starts before sessions and felt that I could make a marked improvement over last time.

The Start

Things went much better this time, but I'll the let the videos do the talking. The first video is of my atrocious Race 2 start. The second video (pardon the quality) is of my most recent start.

I didn't lose any spots and I may have even gained one or two!

The Race

Things usually get sorted out by the carousel and you can start picking out the people you know you're going to pass. Unfortunately, there's usually someone to my aft targeting me as well. By the second lap I was literally parked behind a bike that I needed to pass now! Even I was twiddling my thumbs and I'm sure it was letting others catch up to me. Heading out of four I got right up on the rear of the other bike heading into the carousel. I was almost licking the rear wheel deciding whether I should pass inside or outside when the darnedest thing happened—the rider must have grabbed a bit of front brake because the bike just washed out in front of me. I was watching the rider and bike skid towards the outside of the corner with sparks flying and I thought "I guess I'll take the inside." This has happened to me three or four times now, but it has yet to lose its surrealness.

I was passed by a couple bikes over the next two laps, but there were a couple bikes I could consistently hear behind me—but not too close. I wasn't worried about them, I was concerned with eking out a few more seconds so I could take a couple spots back!

Taking the long way around of #809 who met an unfortunate fate later. The 2006 Suzuki of #730 did eventually get me, but I must say that I think I look much better.

Besides improving my start, I could tell that I had gained something else this weekend: consistency. Although I was still hovering around my best time from our last outing, the times I was posting were more consistent lap by lap. It wasn't one flying perfect lap that dropped me down to a new low time—every lap time was more consistent from about the third practice session on. Consistency is much easier to build on and adjustments can be made towards real improvement.

#688 also eventually passed me, but I kept him in sight until the end.

An Early Ending

Besides the rider that washed out in front of me in the carousel, this race was a melee from the get go. Approaching the bus stop a lap or two after the carousel incident, I witnessed one bike taking the other out with quite a bit of force. Both riders were okay, but according to lugnut, mere moments afterwards a more serious incident took place at turn 7 bringing out the red flag. The race was roughly only half done and that was the end of my weekend. I was disappointed as I was really starting to feel good on the bike again and was picking up speed. All in all, I finished 16th out of roughly 30 that started the race, so, I'm still moving up!

This was an early ending for another reason. This race was our last of the season. We wanted to get in four races but, alas, we now face one of the most awful things that can happen to a motorcycle rider—our real jobs getting in the way. So, for now we have to go to work (the thought of which is just excruciating, I know). But we will be back next year and, with some luck and a lotto ticket, ride every race. Really though, we will be back and going for another half season in 2008.

The Moto411.com BigPussy Honda will be back next year, and it will be 7 years old!

We would like to take a minute and thank our "sponsors": Moto411.com, Big Pussy Racing and Bog Bros Serf Shop. Anytime you support one of these brands, you support us and our quest to build this site into an evermore useful source of unbiased information and reporting.

"Sponsors":

Sunday, July 29, 2007

How-To: Selling Online Part 2: Exchange

We are not experts. This article is provided for educational purposes only. We do not offer a warranty of any kind (express or implied) on the usefulness, validity or accuracy of the information presented herein. In other words, imitate us at your own risk.

Related Articles

Introduction

In Part 1 of this series, we discussed how to start to build trust and establish value with potential buyers through an item listing. In this part, we will deal with the nitty-gritty of the actual exchange once a deal has been negotiated and a buyer has committed to the purchase.

Payment

Historically, when individual buyers and sellers didn't live near each other, person-to-person payments were a challenge since there typically wasn't any recourse for a buyer if the seller sent damaged goods (or no goods at all). In the last decade or so, several companies have emerged to fill this gap, the most widely-used probably being PayPal1.

In addition to PayPal, there are several smaller offerings such as BidPay2. For items of significant value (like aftermarket carbon fiber wheels or entire motorcycles) using an online escrow service (e.g., Escrow.com) may be useful in helping to solidify a transaction. Be aware, however, that sellers can suffer by using these services as dissatisfied or fraudulent buyers can cause the seizing of the seller's assets in a dispute.3

If you find yourself doing a lot of sales and are considering making a small business out of your sales activities, you may wish to investigate merchant account services to be able to accept credit cards directly. One such provider is First Data. While this is beyond the scope of this article, you will want to familiarize yourself with the various different policies and regulations of each credit card you choose to accept as well as the merchant account provider if you take this route.

If the buyer has no other means but a cashier's check, try to insist that it be purchased through the US Post Office. Indicate to the buyer that you will need at least ten business days to make sure that it clears. Alternatively, if the buyer uses a bank that has branches in your local area, you can often take a cashier's check from that bank to any of its branches and get cash immediately.4 Do not accept a cashier's check from a bank that doesn't have a branch in your area as you will be unable to verify that it isn't a forgery.

In most cases (unless the buyer insists upon using it, but only to send you money), Western Union should be avoided at all costs. It is completely devoid of security and provides next-to-nothing for recouping one's losses which is why it's such a favorite with fraudsters. As a general rule, never use Western Union unless you know the other party personally.

Packaging

Getting your items packaged properly is one of the most critical steps in the exchange. No one ever wins when an item is damaged during shipping. We want packaging that is inexpensive, but prevents damage during shipping in all but the most abusive of situations. We may not get out of the packaging stage without spending any money, but we'll try to keep it to a minimum. Reuse of existing packing materials (boxes, foam peanuts, bubble wrap, etc.) is by far the best way to keep costs low. Be warned however, that if a cardboard box looks too ragged or has evidence of previous shipments, shippers will often use that to deny insurance claims if they are made (see Shipping below).

If you don't already have anything on hand, you can usually avoid spending much with only some minor creativity. Most shippers (the US Postal Service included) now provide boxes of varying sizes free of charge to customers. Some post offices provide recycling bins where junk mail is often deposited by PO Box holders. These can be full of fliers, phone books, newspapers, etc. which make excellent filler materials. If you can anticipate your shipments, saving your own newspapers is useful too. While I won't advocate regularly raiding your local 7-11 or gas station for stacks of the "free" publications they often have outside, these can be useful in a pinch.

Sometimes with large or awkward items, you just have to bite the bullet and go buy a large cardboard box that will fit and some foam peanuts or other filler. If you have time, shop around for a reasonable supplier of these materials.5 Check stationary stores or packaging stores. Avoid places like UPS Stores, Kinkos and U-Haul. With major chains, margins on packing materials is often quite large. If you can anticipate the cost of packaging, include it in the shipping/handling costs of your listing, but don't spend three days of your time patching together a strange-looking package with re-re-reused materials to save $15. It's just not worth it.

Three things I recommend that you do purchase are: packing tape, cheap paper towels (or toilet paper) and bulk rolls of cheap plastic wrap. Both can be found at Costco, Target, etc. You can also find smaller rolls at your local grocery store, but they will often cost three-to-four times as much per unit length. Don't bother spending more money on name brands, just get the cheapest ones you can find.

Once we've got our basic materials, we're ready to start. If an item is damaged during shipping, the damage can most often be attributed to one of two things: compromising of the exterior package (e.g., the part wears through the cardboard and bangs against hard objects outside the package); insufficient filler (e.g., the parts bang against each other inside the package). We're going to demonstrate how to minimize the likelihood of either.

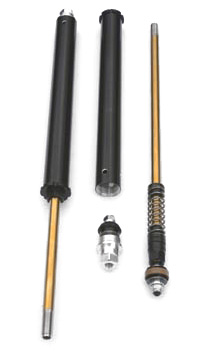
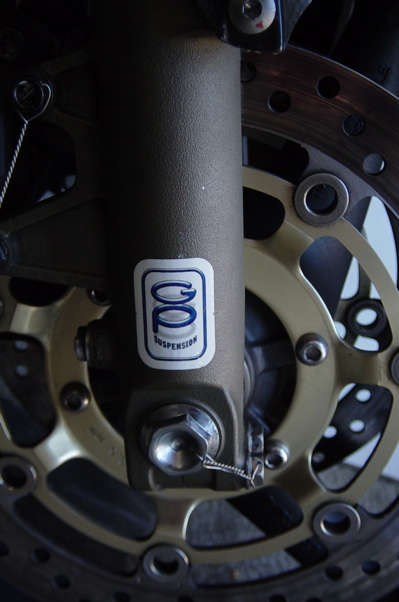
The first thing we do is protect the most delicate parts of the items we're shipping. With forks, these are usually the fork caps. I typically wrap the fork caps in paper towels. In this example, we've even gone so far as to cut some cardboard tubing we had left over from one of my rolls of plastic wrap to act as cap protectors. Then we wrap the entire fork ends in bubble wrap or newspapers to create a nice bulge. The function of this bulge is to help keep the forks away from each other during transit. Finally, we wrap the bulge in plastic wrap6 to make sure it stays together and doesn't fall off.

Show your buyer you care by taking care of his parts:

Next, we wrap the fork bottoms. We do this for two reasons. First, it works with the fork cap wrapping we just completed to keep the forks from banging against each other during transit. Second, it helps prevent the hard fork bottoms from compromising the packaging itself.

Finishing the fork bottoms as well:

Ready to box it up:

With this particular part, with careful planning we can make good use of the available Priority Mail boxes. While no single box will contain the forks, several of them in a creative combination will. We will use three: one on each end overlapping one in the middle. The first step is to pad the bottom box before putting in anything. We've used a DHL bubble mailer.

Share the love; DHL and USPS working together:

After putting in some additional padding, we can put in the forks and continue to pad them all around the interior of the package and between the forks themselves.

Don't skip on the filler; nothing should move inside the package when we're done:

After putting in some additional padding, we can insert the middle box, put in the forks and continue to pad them all around the interior of the package. Our ultimate goal is zero direct contact between the forks and the cardboard and between the forks and each other. We also want zero movement inside the package. This is something amateur or neophyte sellers almost always get this wrong with large, heavy or awkward parts like forks or wheels.

When the forks are inside and well-padded, we can put on the final box and tape everything up. You should not skimp on tape. Some insurance policies actually dictate that all seems should be covered by tape (see Shipping below).

The finished product:

Shipping

Once your item is properly packaged, shipping should be a relatively simple matter. I highly recommend finding one (maybe two) shipping providers with which you are comfortable or familiar and sticking with them unless there is a good reason to do otherwise. Many providers allow the ability to create accounts and print shipping labels from your own computer which can be a big time saver over standing in line at a Post Office or UPS Store. To print your own labels however, you will need a somewhat accurate scale in order to provide the package weight.

For each package you ship, you must be prepared to ask yourself a key question: whether or not to self-insure. Ask yourself, "can I afford to lose this package entirely?" If the answer is yes, then keeping the few dollars it would take to insure the package might be a good investment. Otherwise, you might want to insure the package. Some shipping companies like UPS insure losses up to a certain amount on every package and provide the ability to purchase additional insurance if needed. If you do self insure, I highly recommend taking the few dollars you saved and putting them aside in a self-insurance pool. Over time, the size of that pool will help you assess whether or not paying for insurance is a good idea.

If you do purchase insurance, you must familiarize yourself with the shipping providers policies and abide by those policies to the letter. Remember, each shipping provider loses money when they pay out on a claim, so they have a huge incentive to weasel out of it any way they can, so give them as few opportunities as possible. For example, the USPS requires that tape covers all seams of a package and does not specify that glued seams are exempt. It's also a good idea to poke around (i.e., do a few searches on the Internet) to see if there are a wide number of problems with that provider failing to make good on claims.7

If you find a shipper you like, but don't like their claims process or insurance offerings, there are third parties (e.g., DSI) which will insure your packages no matter who you use as the shipping provider. You may wish to investigate these as well and find what works best for you.

If you like to use UPS or the US Postal Service and you receive the buyer's payment via PayPal, you can create a shipping label directly from the PayPal website. In fact, the number of USPS shipping options is actually higher via PayPal than it is on the USPS's own site!8 If the buyer is paying through some other means but still has a PayPal account, I will sometimes send a 1¢ invoice just to be able to use PayPal's integrated shipping services.

Follow-Up

Once the shipping label has been created or the package has been shipped, it is a good idea to inform the buyer of that fact and include any tracking or shipping reference numbers if available. Most shipping services do this automatically. If you ship via UPS or USPS through PayPal, PayPal will attach the tracking number to the payment and send an e-mail to the buyer. While I am not personally a fan of PayPal, their integrated shipping features are hard to beat.

Unless you receive an unprompted "thumbs-up" from the buyer (e.g., in the form of positive feedback, a thank-you e-mail, etc.), it is usually a good idea to follow up with the buyer after you know the package was (or should have been) delivered. This will really make the buyer feel like you care and are going the extra mile to make sure they are satisfied.

Something-For-Nothings

At some point, you will find yourself dealing with someone who goes beyond a discerning, detail-oriented (i.e., "picky") buyer. My wife works in the hotel industry and in her business they call these people "something-for-nothings" because they always want the best services and perks but never want to pay for them. It is usually best not to deal with these people at all, but if you fail to identify one before the transaction is underway, you may find yourself in a fairly uncomfortable position. It is usually best to minimize the time spent dealing with these people. Find a compromise that causes you the least amount of pain and move on. Make a mental note never to deal with that person again.

Conclusion

Hopefully this provides a useful view into the successful completion of selling goods online by providing some helpful, yet inexpensive ways to keep your buyers happy. I'll leave you with this gem: go the extra mile to retain your good customers and refer your bad ones to your biggest competitor.

1. In 2002, eBay acquired PayPal for a mere $1.5 buh-illion (with a "b"). This should give you some idea as to how much of a market there is for convenient person-to-person payment mechanisms.

2. BidPay was originally based on an explicit buyer-pays transactional fee model. While this was lauded by sellers, it was largely rejected by the marketplace and the company ceased operations in 2005. However, the brand and certain assets were acquired by CyberSource in 2006 for $1.8 million. CyberSource has since resurrected the service but with a seller-pays model much like PayPal. For some reason, buyers do not like to know when they are paying overhead....

3. See PayPalSucks.com for some examples. With any third party payment service, it is always essential to familiarize yourself with its policies before using it.

4. Banks will often ask for two forms of ID in order to verify you are the intended recipient of the check. In most cases a state driver's license and a credit card is sufficient. They may also ask you for your social security and in some cases require you to provide your thumb print on the check. If none of this sounds appealing to you, you should probably avoid it altogether and require another method of payment. However, if you can stomach it, it can be a fairly convenient way to quickly get a cash payment from your buyer.

5. Don't kill yourself trying to find the cheapest cardboard box. One technique I've used that has worked well is that I find a place I want to investigate and go buy what I need. The next time, I go somewhere else. Unless the price is absolutely ridiculous at the new location, I just buy it (even if it was more than what I found previously). But I make a mental note who was cheaper. After I've investigated two or three locations, I usually just pick the one with the most reasonable prices and stick with it until I hear about something better.

If you do find a location that has high prices, you might want to ask, but you should always make an effort to remain polite and non-confrontational. You might find the shop or store owner and say something like, "I noticed your boxes are rather expensive compared to [The Other Place]. Do you know why there's such a discrepancy?" Keep in mind, this may not be the shop owner's fault. She may not even know that she's being rooked by her own supplier. It may prompt her to go find cheaper boxes. Of course, it also may prompt some aggression such as, "If you don't like my prices, go buy your @#$%ing boxes at [The Other Place]!" In these situations, it's best to thank the person for their time and politely excuse yourself from the premises.

6. Why plastic wrap? First, it's really easy to work with right off the roll. Second, it's actually cheaper than packing tape. Third, it's is much easier to remove than tape on the other end. Tape often leaves a sticky (sometimes colored) residue that is a real pain to remove.

7. As of this writing, FedEx only pays up to $100 on any claim regardless of the declared value. See consumeraffairs.com for details.

8. This is pure conjecture, but I believe this is because the USPS is trying to promote it's higher-end services like Priority and Express mail and hence makes it arbitrarily more difficult to easily send items Parcel Post or First Class.

Saturday, July 14, 2007

Shameless Cross Promotion: New Big Pussycat™ Shirt

Big Pussycat™ has a new shirt design. <ShamelessPlug>We highly recommend you check it out.</ShamelessPlug>

Get 'em while they're hot:

Sunday, July 08, 2007

How-To: Selling Online Part 1: Listing

We are not experts. This article is provided for educational purposes only. We do not offer a warranty of any kind (express or implied) on the usefulness, validity or accuracy of the information presented herein. In other words, imitate us at your own risk.

Related Articles

Introduction

We're going to try something new here on Moto411. With this article we're going to venture into the world of instruction and attempt to accurately convey what it takes to accomplish a non-trivial task. The previous warning should give some indication as to our level of confidence with this venture.

Buying and selling goods online has become a widespread practice for most riders. The cost of seemingly minor repairs or enhancements can rival the cost of a bike itself and many do-it-oneselfers turn to the secondary market to acquire usable, but less expensive components. craigslist, eBay and bike-, area- or event-specific message boards are venues on which buyers and sellers have come to rely for being able to perform these transactions. Auxiliary services like PayPal, BidPay and even the US Postal Service have allowed almost anyone to buy and sell goods in these marketplaces.

In this particular installment we'll cover how to successfully list a particularly fragile, typically expensive and critical component: front forks. Specifically, we'll be attempting to sell a pair of used 2004-2005 GSX-R600/GSX-R750 forks with pinch bolts. They are not perfect, but they are straight with good seals and are perfectly usable. We'll share techniques and how to provide the best service one reasonably can in order to ensure a fair price and a smooth transaction. In Part 2, we'll cover the details of the actual exchange.

Motivation

Motorcycle owners are notoriously cheap (this author included). They tend to expect the best parts and services for the absolute lowest costs. Some would rather spend three hours in negotiations than pay the extra $50 and be done with it.1 Even worse, given enough time, everyone on all sides of a transaction will be conned or defrauded by a predator at some point and will tend become even more conservative in behavior for future transactions.

From a seller's perspective, these can be very hostile marketplaces. This is why it is absolutely critical to establish two things with buyers as they evaluate the goods one has for sale: value and trust.

These two simple words have been perverted by marketers everywhere to basically mean perception of value and illusion of trust, so it makes a good seller's job even more difficult. I tend not to use these words very often for that very reason. In my experience, the best way to establish these concepts isn't by talking, but by doing.

Preparation

The first step in establishing your own value and trustworthiness in the eyes of potential buyers is in how you present your items for sale. This is fairly easy to do and doesn't take that much extra time or money.

Isolation

Before doing anything (if you haven't already), you should (carefully) remove the part to be sold from the bike. This sounds like it should be obvious, but based on some of the listings I've seen, it isn't. This demonstrates to potential buyers that you are competent and knowledgeable (enough) to perform basic mechanical services. The implication is that you're not going to damage the parts during tear-down. It will also make the next step much easier.

Cleanup

Clean the parts to be sold. I can't stress this enough. This also sounds like it should be obvious, but it is amazing how few sellers actually perform this step. Simple soap and water is often sufficient (I like to use 10/1 water and concentrated Dawn in a spray bottle). For dirtier components, DuPont's line of car care products and Protect-All are two of my favorites. WD-40 can also act as a good de-greaser, but it does have its drawbacks (it tends to smoke when heated, so think twice about using it to clean cylinder heads or exhaust components). Avoid using kerosene or brake or chain cleaner unless they are recommended for that application. While these products tend to cut through grease well, they can discolor or damage certain materials like rubbers and plastics. Familiarize yourself with chemicals before using them.

This also has another benefit: you will be more likely to notice any problems with the components before you list them. This indicates to your buyers that you can be trusted not to use dirt and grime to hide additional damage or imperfections. They'll also be happy that they won't have to perform the cleaning (and flaw discovery) themselves when they receive the parts.

Imaging

This is perhaps the most important step in the process. Like food photographers, your job is to make your components look as appetizing as possible. Never put sensitive components (like rotors, wheels, forks, etc.) on concrete. This demonstrates a distinct ignorance of the minute tolerances of these parts. Use a furniture pad as a backdrop. This shows potential buyers that you know and care about proper handling of the items you're trying to sell. If you don't have a furniture pad, you can use a carpet scrap, a welcome mat or even an area of your lawn (though this is the least attractive option).

It's good to provide a single "overview" shot depicting all of what's for sale:

Anticipate questions about the frequent trouble spots of the components and answer those questions with visuals. For example, with forks, one wants to show that they are straight, that they have not be crashed, that the adjusters are in good shape, and they have good seals.

Fork caps are often damaged in a crash; it's important to show that these are in good condition:

Seals are cheap, but replacing them is not; it's important to show that these forks can be used right away:

With pictures, there is such thing as too much of a good thing. Strive for quality, not quantity. Don't bombard viewers of your listing with thirty-two pictures of the fork caps from different angles. If there are imperfections, don't attempt to hide them. Buyers who are unpleasantly surprised are one of the costliest prospects for a seller.

These forks aren't perfect; we will highlight the imperfections so that our buyer knows up-front:

Listing

The text of the listing not nearly as important as the pictures, but it is still useful to set/reaffirm expectations for buyers. There are several key elements I like to provide in my listings. First, I like to be polite and up-beat, but I also like to stay concise. The more words that are on the page mean the fewer of them will actually be read.

Second, I like to list what is actually for sale. This is often in the form of a list:

This listing includes the following:

  • 2004 GSX-R600 forks
  • axle pinch bolts

Try to avoid getting lazy and using the same picture to sell several different subcomponents in different listings. If you're tempted to write something like, "...includes everything pictured except for...," you might wish to reconsider. Buyers aren't always careful to read everything. They might buy your forks, but be upset that the package they received didn't include the pictured triple clamps.

Third, I like to list the makes/models which I know they will fit. I will also pay lip-service to some more "creative" applications, but with the appropriate caveats:

These will fit:

  • 2004-2005 GSX-R600
  • 2004-2005 GSX-R750

These can also be used in a 2003-2007 SV650 front-end conversion, but will require additional components (triple clamps, front wheel, etc.). Please check with a reputable and knowledgeable mechanic before purchasing.

Fourth, I like to highlight any imperfections shown in the pictures.

As shown in the pictures, there are a few marks from mounting and two rock chips on the upper bodies, but otherwise, they are in good shape.

I also like to highlight the good things about the items:

They have fewer than 3,000 miles and are straight with good seals. They have not been crashed.

Your text should be consistent with your pictures. Inconsistencies chip away at trust and call into question your integrity.

Fifth, if you have the means, you may wish to take the time to measure the components to make sure they are within specification:

Run-out is 0.1 mm and is within factory specification.

Finally, I like to provide as many specific terms as I think are relevant. For example, buyers are not often in the same area and require that goods be shipped to them. If you can, provide an estimation of shipping costs. If it is merely an estimation, but if you intend for the buyer to pay actual costs, make this clear. If you require that the buyer use a specific method of payment, or if different types of payments have different terms, then enumerate these. For example, it is appropriate in some venues (but not others) to ask that buyers pay an additional 3% if paying via PayPal (to help cover the fees). If you provide a return or satisfaction policy, try to make clear what those policies are.

Q & A

Expect that potential buyers will ask you questions that are already answered by the listing. Many people do not read listings in their entireties before asking questions. This is why it's important to keep a listing as short as possible. When questions like this come up, politely answer them as best you can. I will often copy-and-paste the text right from the listing and then encourage the buyer to ask additional questions if necessary.

Many venues allow questions to be asked/answered publicly. Take advantage of this wherever possible. This goes to further establish trust and value in that you're reiterating that you are knowledgeable about the components you're selling and have nothing to hide.

When answering questions, do not attempt to establish that a part is definitely within usable requirements without actually performing the measurement and knowing the requirements. Don't be afraid to say, "I don't know," but try to answer the question to the best of your ability.

Conclusion

Hopefully this provides some useful advice on how to successfully establish yourself as a trustworthy and valuable seller of components in your listings. In Part 2, we'll cover how to successfully complete a transaction and what to do if there is a dispute.

1. While, on paper, I agree that the practice of expending US$200+ of time, energy, etc. to save US$50 on a transaction is absurd and doesn't help anyone (buyer or seller), I have found myself doing exactly that at times. There have been very few times that I haven't regretted it. Perhaps this is a commentary unto itself about human nature....

Sunday, July 01, 2007

Part Review: Motovation "No-Cut" Frame Sliders

Quality: ++++-(4 out of 5)
Functionality: +++--(3 out of 5)
Appearance: ++++-(4 out of 5)
Value: ++---(2 out of 5)
Overall: +++--(3 out of 5)
Pros:
  • excellent fit & finish
  • easy installation
  • no bodywork modification required
Cons:
  • expensive
  • prices on replacement parts are insulting
  • no-cut bracket causes fairing damage on impact
  • sales staff hard to reach to answer questions

Introduction

Anyone who's crashed, downed, dropped, or otherwise abused a motorcycle in the past at some point considers purchasing frame sliders. It is useful to remind even the most "seasoned" of us that frame sliders are called frame sliders (and not "engine cover sliders", "fairing sliders" or "muffler sliders") for a reason: they are not meant to protect anything in earnest except for the frame. That being said, one tends to incur much less damage to one's engine covers and fairings in a low-side with frame sliders than without them. However, if you're considering the possibility of a crash while wanting to preserve the newness of your stock fairings, then I suggest removing them and keeping them in the garage, no matter how many frame sliders you own.1

Impression

My initial impression when I ordered these suckers was, "they'd better be darn good," since I paid about US$220 for my set (frame sliders, clutch slider and swing-arm spools/sliders). I will say that they met those expectations, but didn't exceed them. Don't get me wrong, they are quite nice. They are made of high-quality materials with a good attention to detail. The designers even went so far as to taper the left-side frame slider so that it wouldn't require it's own bracket, but could still be mounted without cutting the fairings. To my knowledge, Motovation is one of the few companies to do this (TSR is another).

Installation

Installation was fairly obvious. The only thing to note is that the torque specs on the 2005 YZF-R6 engine bolts is fairly low. The right-side no-cut bracket mounts to the frame via a single bolt and there is not much keeping the bracket from articulating on that mount point.

To be fair almost everyone's designs are similar in this regard. I have seen one (and only one) maker of frame sliders who actually makes no-cut mounting brackets with two mounting points for the bracket, and a third for the slider. I wish I could recall who that is, but I can't as of this writing.

Mmm, sliders:

Use

Normally, I don't like to down my bike just to test a product, but this seemed an appropriate occasion, so we went to dump at Streets Of Willow to see if these sliders would perform as well as they look. I picked the right side, since there was more to damage (exhaust and all) and it would give an opportunity to test out the clutch slider as well.2

Ooo, that's gotta hurt:

Clutch slider (turned upwards):

After executing a textbook low-side, I had plenty of data to evaluate the sliders. As you can see, the sliders did their job and held up quite nicely. As predicted, the right frame slider did rotate on the engine mount point and was crushed right into the fairing. The fairing lost. Luckily, I had my fiberglass track fairings on at the time (which seemed prudent given where I was at the time), so a repair wouldn't be that difficult.

Back on the track at Thunder Hill after "testing" the sliders (and replacing the exhaust can); note the crack in the fairing below the frame slider:

When I purchased the sliders, Motovation had not yet made replacement parts available for purchase. They constantly ignored my e-mails and phone calls to replace my rashed parts. Perhaps this was because they knew they were eventually going to make extra spools and things easy to purchase via their website.

Well, they finally did, and I have to say I was astonished at the cost of a replacement spool. I was already somewhat put off by the cost of the slider kits to begin with, but this was ridiculous. They wanted US$45 for a right-side replacement spool and another US$65 for a replacement clutch slider!

Conclusion

I liked how the Motovation sliders held up in a crash, but I never expected them not to. They looked great, but their cost was high and got even higher post-crash. I especially didn't like the fact that I would be spending more in replacement parts than what most other makers charge for entire sets. And, although not many of us like to crash or think about it too much, I ultimately decided to sell what was left of the Motovation sliders and try a different (less expensive) brand which wouldn't leave me high and dry after my next...uh..."incident".

1. bigpuss is up to two sets on his F4i.

2. What lugnut means to say is that he is an idiot and was lucky enough to have any frame sliders when he decided to throw the bike into a right-hander while trying to trail brake like he was Noriyuki Haga.

Thursday, May 31, 2007

The Racing Experience Part 4: Our Second Race

And we're still improving by leaps and bounds! That's the nice thing about starting from the bottom; you have no place to go but up and improvement comes quickly. I will enjoy it while I can, I have a feeling things will get harder from here on out.

Second Race Goals and Expectations

For our second race I set only two formal goals: 1) finish at least fifth from last and 2) look much cooler than I did last time. Lugnut had mentioned during the first race that if someone of my skill level focused a little bit on looking good, it might actually help me go faster. Lugnut did have a historic basis for suggesting this: at a tack day last summer I was "caught" by a track photographer mugging for his camera. I saw he was at the corner and I did my best to lean that bike over more and get on the gas. Vain? Yes. When I was mugging was I going faster? Yes. The photographer came in after the session and mentioned just how transparent my efforts were, but he also remarked that I did indeed take the corner better because of it. So, as a beginner, just pretend there's a photographer in every corner and your bound to shave some seconds off your lap times.

Early in practice I was hard at work trying to look better for the photographer.

I did indeed need to shave seconds off my lap time. If I made the assumption that roughly the same people would be entering the race again this time and that they wouldn't be getting any faster (I know, that is faulty, but bear with me), I needed to shave at least three seconds off best lap time from the previous race. But, if you also assume that everyone else is trying to shave 3 seconds off their lap times, it would make sense that I would need to do better than that.

I Need All The Practice I Can Get

Four sessions, which amounts to roughly 16-20 laps, is all you get on Saturday before the Clubsman races. It's also a pseudo qualifying as your practice times are factored into your starting position. I need much more practice, but my most basic goal for practice was to start off doing times close to where I left off during the last race. The morning was cool and foggy and, being in practice group 1 with the rest of the Clubsman, we went first—with no time to let the fog lift or the track to dry. I was only moderately worried about the slightly damp track and decided to use the session to try some new lines I picked up while watching the AMA races one week before. No such luck. My visor fogged up within seconds of hitting the track and opening the visor only made it worse. We were riding in a cloud and I had not put any sort of treatment on my visor. I pulled into pit lane, coated my visor with saliva (an old SCUBA diving trick) and went back out. Again, it fogged up almost instantly. I didn't get in a single real lap that session, lost out on a full 25% of my practice and pulled into the paddock really pissed off. I wasn't mad at anyone or anything, but I really needed the laps and my first session was a complete loss.

Lugnut had a solution (he always does). His spray bottle with a highly diluted Dawn dish-soap solution did the trick. Spray it on, wipe away the excess and bam, no fog! It seems this Dawn solution does just about anything you need it to (cut grease, stop fog, quench thirst, etc.), but at the moment I was just happy that I would never fall victim to the foggy visor again. It was all a moot point for the rest of the sessions as the sun did eventually break through the fog, but at least we're ready for next time.

The sun came out and all was well.

By the end of the second practice, my lap times were down in the range of the last race, so I felt I was doing okay. I kept working on my lines and my braking for the next two sessions and ended up taking another second or two off my race times from our last race and was gridded on row 5 (versus row 10 like last time).

On a side note, I had the benefit of learning what it feels like to run out of gas on the track. Lugnut is the master of giving me just enough gas for the laps I need to run plus some contingency fuel to account for the warm-up lap, delays, etc. However, if you don't remind him to put gas in the tank, you tend to run out pretty quickly on the following session. I was leaned over in turn 2 when the bike first shut down—it is startling and does disrupt the chassis a touch, but it's really no big deal. Once the bike was straight up and down again, it fired back up. Through the carousel (a long downhill 180° left-hand corner), the bike really tried to die, but keeping it upright seemed to help nurse it along. I nursed it around the track and back into the pits—stuttering evermore as I neared our pop-up. It died just as I put it up on the stand. At least then we knew how many more laps the "contingency fuel" gave us.

The Start

I don't have the oldest bike our there, but I'm definitely in close contention for that title. I'm down about 20 horsepower compared to newer 600s, am heavier (both the bike and rider), I have stock gearing, and, at the time of this race, only had one start under my belt. Yet, there I sat with half the field behind me waiting for the green flag. As the green flag dropped and the field headed up the sweeping left-hander into turn 2, I ended up roughly 10 spots from last. Below is a video of the start which I am ashamed to post, but it must be shown because the shame it invokes will only make me go faster next time. That, and we're going to change the gear ratios a bit. Infineon is a technical track with few straight-aways and, with the F4i's stock gearing, no use for 6th gear. We are going to switch to a 520 chain, drop a tooth up front and add a tooth in the rear. For a track where acceleration off the line and out of corners can make a huge difference, this should help quite a bit.

The Race

I was feeling really good once we all got slotted into place. I had been passing some people during practice, but the race pace is always a bit faster and I had to wait and see if my pace was going to be up to par. I set my sights on a bike in front of me, reeled it in, and passed it. Wow! That feeling is very addictive. I wanted to do it again! So I set my sights on the next bike and started reeling it in, albeit more slowly. As I was reeling in my next target, I was also passed. "Oh well," I thought to myself, "maybe I can use this guy to help tow me up to the next bike." It did help for a lap or two, but then I lost touch with him and was back on my own.

This bike did pass me, but helped tow me along for a lap or two.

I was determined to make that one more pass before the end of the race. The bike or the rider's leathers were red so it was easy to keep targeted and I was making up time, just not fast enough. Also, unbeknownst to me at the time, there were a string of two or three bikes that had been behind me for most of the race. They hadn't been fast enough to get by me, but they were close enough that any mistake would give them the chance they needed.

I certainly wasn't holding them up, but they were ready to pass if the chance arose.

After seven laps, we were given the white flag at the start/finish. I had one more lap to catch "red bike." Unfortunately, I was dealt a new problem as a white bike came flying past me to beat me into turn 1. What? Oh no he didn't! I needed to take that spot back and I was pretty sure that I could get it back coming out of 2 and going into 3a if I just got on the gas early enough. I leaned the bike through the corner, tried to point it to the inside of the white bike and got on the gas hard. This is when the race got extra fun.

But first, a bit of historical perspective. At my third track day I was on a set of Dunlop street 208s that had seen a moderate amount of riding (and obviously a previous weekend of track time). The tires felt fine for most of the day and then, very suddenly from one lap to the next, became greasy. I opened the throttle out of a right hander and the rear slid out, I shut the throttle off, it caught and spit me out of the seat. There was no crash mind you, just some pain between my legs. I thought it might be an anomaly so I collected myself and got ready for the next corner. It happened a second time, although less intensely, so I decided those tires were done and I should call it a day. Now, I really hadn't been paying attention to how much time/how many heat cycles my current track 208s had endured. Now that I think back, it was about three track days and one practice/race day. Before last race though, we hadn't been using tire warmers on those tires. Needless to say, the tires could have been in better shape. Now, back to the race!

As I got on the gas hard (well, as hard as a stock F4i can) in turn 2, I felt a familiar sliding feeling. Not the "oh, the tire will eventually catch" feeling, but the other one, the "oh, my tire feels much different that it did last lap" feeling. So I shut off the throttle. And the tire caught. And the bike shook. And my foot came off my right peg. And the bike cavitated side to side a bit before heading straight again. I was not going to pass the white bike back, but at least my bobble hadn't caused me to loose a spot and I was on the last lap. I was sure however that the lost time probably allowed whoever was behind me to close any gap there might have been. Plus, now there was blood in the water, they had seen and could smell my weakness. The tire slid a bit through the remainder of the right-handers and I kept my fingers crossed through the long high-speed left-hand carousel that the left side of my tire was doing a bit better. It held and, as I was coming to the last corner before the checkered flag—a tight low-speed right-hander—I was passed coming into the corner. Knowing my tire had seen better days, I turned my bike in, tried to get it mostly upright again and pinned the throttle towards the finish line. It was no use, the SV650 had more grunt and I lost yet another spot mere yards before the end of the race. Had I fulfilled my goals? I wouldn't know until the results were posted days later.

Had he done it? Tune in next time...

Yes, yes I had. Exactly fifth from last and more than 4 seconds faster than last time. And I think the pictures are looking a little better too. For next time, we have fresh rubber and new gearing so look out! If I can keep the bike up, I'm gunning for mid-pack! Ride safely and see you at the track!

We would like to take a minute and thank our "sponsors": Moto411.com, Big Pussy Racing and Bog Bros Serf Shop. Anytime you support one of these brands, you support us and our quest to build this site into an evermore useful source of unbiased information and reporting.

"Sponsors":

Monday, April 30, 2007

The Racing Experience Part 3: Our First Race

Nerves of Steal! (Rusty, Old, Broken Steal)

It was a week before Team Moto411.com's first race and I was nervous to say the least. Not that I really should have been, it wasn't even a real race. What I was about to participate in was a Clubsman Race—a race with no points, no prizes and no prestige. The Clubsman Races serve two main purposes: 1) they allow you to get used to riding competitively and 2) they allow the AFM to assess your skill level before they let you on the track in a more serious series.

I was most nervous because I have never ridden Infineon Raceway on anything but a pit-scooter. Tourist Trophy for the PlayStation 2 has a pretty accurate recreation, but a controller and a monitor can help only so much.

What's even cooler than Helimot leathers? A Helimot transponder case of course.

The Pre-Race-Weekend Track Day

To ease my first time racing/first time at the track worries, I signed up for a track day at Infineon the Friday before the Saturday AFM sessions. Not every AFM weekend is preceded by a track day, but in this case it was. Our good friends at Pacific Track Time (with whom I took my licensing course) set me up with a few sessions so I could get a feel for the track.

I find that, as an amateur, I am always far too tense the first time I get on the track and hence I exert huge amounts of effort to go rather slowly. As all my muscles fight against each other and the the bike, my riding is choppy, my performance is poor and I'm exhausted after a couple laps. This particular weekend it took me 6 sessions and the race to start feeling comfortable and fluid. The Infineon Raceway track is, in my opinion, quite fun and quite nice. Despite, or maybe due to the elevation changes and the lack of straightaways, I found the track very pleasant once I loosened up. However, if I didn't go the day before, race day would have been painful.

If you have natural skill and/or youth to spare, I could see this being a much smaller problem. But, if you merely dabble in motorcycle racing and your youngest days are starting to tick away, I suggest getting at least 15 laps in on the track before your three practice sessions on race day.

By the way, lugnut made me a couple seconds faster with a pen and some tape. I highly recommend it!

What is this, amateur hour? Yes, yes it is.

The Value of A Hotel/Motel—No Really!

Even though this track is only an hour or two away from the "Moto411.com racing garage," we decided a hotel close to the venue would be easiest on everyone especially considering we had a track day prior to the race. I had a fair amount of Hilton hotel points saved up from a job that required me to live in a Los Angeles Doubletree for a month (ugh!), so we used those to book a room at the Embassy Suites about 10 minutes from the track. Short of using points, usually lugnut and I find the cheapest motel we can—with some pretty funny/scary/disgusting results. The Embassy Suites, in all its mediocre glory, made us feel like kings in a castle compared to our usual accommodations. The real value of not getting up at 4am to go to the track is that, come race morning, you feel nice and rested.

Many riders camp at the track in tents or trailers and take advantage of Infineon Raceway's decent shower and bathroom accommodations. Given the sheer number of people at the track overnight, we staked our paddock claim for the next day and left the bike and tent—making the following morning even more leisurely. We did lock up the bike, but, to this day, a motorcycle paddock is one of the few sacred places left in our world—where everyone looks out for each other and bad apples are still rare... for now. That all might change as this sport becomes more mainstream. I hope it doesn't.

The real value of the hotel was the continental breakfast. It was a complete made-to-order breakfast bar! Omelets, pancakes, waffles, eggs, bacon, sausage, you name it and (if it was mainstream) they had it! The Moto411.com team ate well that morning. I'm not talking high quality, but if I had to choose between the hotel breakfast and a Denny's, I would choose the hotel breakfast—I know... that's not saying much.

Remember, the most important thing about your bike—wheel stripes!

Race Day Morning

The Saturday of the Clubsman Races consists of rotating practice sessions for all the racers and then the three Clubsman Races (light-, mid-, and heavy-weight) at the end of the day. All the real races are the following day, on Sunday. The morning was relaxed and went something like this:

Riders Meeting

Practice Session Group 1
Practice Session Group 2
Practice Session Group 3
Practice Session Group 4
Practice Session Group 5
Practice Session Group 6

Practice Session Group 1
Practice Session Group 2
Practice Session Group 3
Practice Session Group 4
Practice Session Group 5
Practice Session Group 6

Break for lunch

The afternoon was equally as predictable:

Practice Session Group 1
Practice Session Group 2
Practice Session Group 3
Practice Session Group 4
Practice Session Group 5
Practice Session Group 6

Practice Session Group 1
Practice Session Group 2
Practice Session Group 3
Practice Session Group 4
Practice Session Group 5
Practice Session Group 6

Mid-Weight Clubsman Race
Light-Weight Clubsman Race
Heavy-Weight Clubsman Race

Photoshop a Ducati 749 underneath me and win a free Big Pussy t-shirt!

You are placed in your practice session group by speed/times at the last event and, on the busiest race weekends, all Clubsman must be in group 1. If you start going faster, you can move up a group—but not as a Clubsman at a busy event.

Overall I had four practice sessions of about 5-6 laps each and then one 8 lap race. I felt I was getting smoother and more comfortable throughout the day and, even though I didn't get faster on the last practice session, I was much more loose and relaxed and did not fatigue as easily.

I spent most of my practice sessions following a Ducati 749 around the track. We were both equally slow and, during the later practice sessions I felt that, under braking, I could pass her—a young lady standing roughly 5' 3" with eye lashes too long to be real. In an earlier session, a rider dove deep inside both of us, passing me and hitting her. It bumped her wide, but she put her head back down and got right back on her line. I asked her about it later and she said something to the effect of "that's good practice for the race! It threw me off for a second, but it was no big deal." At that moment I had rethink my approach, find my male genitalia and get my ass somewhat more in gear.

Lugnut, with all his "championship winning [whining?] experience" had been telling me to get my ass in gear all along, and he was right. He had made two [other] key observations: 1) When I came in from practice, he could comfortably put his bare hands on my brake rotors and 2) he remarked that, I looked like I was on a Sunday ride. A picture I saw later (and which I will not be posting here) confirmed that, indeed, when everyone else was tucked down in their most aggressive racer form, I looked like I was pulling up to a stop sign. Also, yeah, I could use my brakes more often. Damn, that lugnut is good!

I'm easy to spot because my whole row was nice enough to move in front of me when the green flag dropped.

The Race

I was gridded 45 out of 54 (outside of row 10) for the race. There were three rows behind me and quite a few bikes in front of me so I decided to be a bigpuss for the first race and not go for any holeshot for the sake of me and everyone around me. My start wasn't what I wanted, even for a bigpuss, but we all eventually filed in line and the racing began.

Sponsorship money-shot! Now, if only I had any real sponsors.

My only goal was to finish, and not finish last. The entire "crew" agreed that I could not count DNFs as being behind me nor could I count riders who remounted after an incident and returned to the track. I had to pass at least one other rider. Also, it would be nice if I didn't get lapped. The short of it is that I did achieve my goal, but fate dealt a helpful hand.

After everyone had settled into the race, I found myself behind a familiar Ducati 749. I was pretty sure there was at least one other rider behind me, and that was confirmed when he passed me shortly thereafter. The rider that passed me, the Ducati 749 and I made up the tail end of the pack. And there we stayed, lapping for 3 or 4 laps—not making any time on each other, just following the track around and pausing ever so briefly at the frequent offs and yellow flags.

The rider that passed me towards the beginning of the race began to fade around lap 5 and the Ducati 749 was opening up a slight gap on us—it was time for me to make my pass and ensure that I didn't actually finish last. I came up beside him into eleven and got a better drive down the front straightaway, passing him right before start/finish—right at a waving yellow flag. Crap! I waved him back by and started setting him up again.

Half way through the next lap, the red flag came out and the race was over. An incident had left a bike laying on the track and, with 6 of 8 done, that was it. Although, I was only lapped by one rider, I finished last. Or had I? In all actuality, I completed my pass before the waving yellow and before the start/finish line. With only half the following lap complete, I could only hope my transponder crossed the line before his. It had! I was second to last! Success!

Am I not hot? When I was in my Indonesia, I was a gigolo!

Conclusion

That was totally worth it! It was the most fun I've had in ages. My goal for next time? I'm getting that Ducati 749 and hopefully one or two other riders. Lugnut figures if I actually use my brakes instead of coasting into corners like I was pulling up to a drive-through, it shouldn't be too hard—even for a monkey.

We would like to take a minute and thank our "sponsors": Moto411.com, Big Pussy Racing and Bog Bros Serf Shop. Anytime you support one of these brands, you support us and our quest to build this site into an evermore useful source of unbiased information and reporting.

"Sponsors":

Thursday, March 15, 2007

The Racing Experience Part 2: Getting Licensed

I Need Another License?

Yes you do! At first, the race licensing process seems like a rather inconvenient barrier to entry. It costs money, it eats up a day of your valuable time and, once you're done, you might find yourself thinking: "I don't think I actually learned anything today that I couldn't have just read in the rules, and my track day money could have been more usefully spent on one-on-one instruction." In fact, the licensing process might be enough of a hassle that you'll skip racing again this year. And that's exactly (well, errr, partially) what it is: a barrier to entry for casual wannabes.

Imagine if every yahoo that got a bug up his boot to go racing showed up at the next race, papers and check in hand, and was allowed on the track to try and qualify. Safety issues certainly come to mind and don't get me started about what else would end up horribly wrong with the sport. The licensing process is incredibly important to a) ensure everyone is starting with the same, although very basic knowledge of racing protocol (you may find this shocking, but there are people who never read through the rules if they don't have to), b) demonstrate that you can ride a motorcycle well enough to keep up with Noriyuki Haga on one of his warm-down laps, c) observe if you can conduct yourself appropriately both on and off the track and, d) make sure you're not going racing as result of some drunken party bet gone horribly awry. In other words, this process forces you to think twice or even three times about what you're getting into.

Putting The Process In Motion

Getting licensed is actually pretty easy once you look into it. It's even easier if you've raced with other recognized organizations in other regions or countries. If it has been less than five years since you've raced with a recognized organization, you don't have to attend any new racer courses. However, for new racers, I've outlined "five simple steps" below for getting into AFM racing.

First: download your application here. Now read it! The entire thing!

Second: if you are new to road racing, read this.

Third: in case you didn't see this when reading the link from the second step, sign up for New Racer School (NRS) at an AFM-approved provider. I went with Pacific Track Time because I'm already familiar and comfortable with the folks who run it. I suggest that, if you have been to track days at one of the NRS providers below, you choose the one with which you are most at ease—this will make you much less anxious the day of. Feel free to contact them before your NRS and ask them what to expect and see if they have any pointers.

Pacific Track Time 530.223.0622
Keigwins @ The Track 650.969.5609
Zoom Zoom Track Days 888.929.9666

Fourth: go back to the second step and read through all the links and documentation the AFM provides before your NRS!

Fifth: prep your bike for racing. Download these two documents (2007 AFM Rulebook, AFM Tech Inspection Sheet) and get your bike as close as you can to race-ready. The NRS only requires that your bike be track day ready (if you haven't been to at least one track day, I might suggest you not go racing quite yet), but prepping your bike to race spec is an important learning experience that provides a better perspective of the effort it takes to go racing.

Optional Step: read all the rules. I know it's 84 pages, but for our sake, at least skim it.

The Day Of

My NRS school was held at Thunderhill Raceway Park in Willows, California—a not-so-distant 175 miles from home base. However, in order to get there in time for bike tech and the rider meeting, we had to rise at a painful 4am. Luckily I had lugnut to drive the Moto411.com/Big Pussy/Bog Bros/Amsoil rig as I nursed a Red Bull and tried to sleep (hmmm, that just doesn't sound right). In hindsight, the thought of staying in a cheap motel the night before began to look really good to us. Next time we wont be so cheap.

Fortunately, we were already familiar with Thunderhill from a previous outing. So, despite our tiredness, we felt relatively comfortable when we arrived. Unfortunately, we didn't spend that much time on the track during the previous track day and were by no means up to full speed. Regardless, knowing the track was a huge help.

We rolled in at about 7:15am and got one of the last spots under the giant metal canopy. There were already many "camps" set up outside of the permanent structure and, if any one of them had decided to use said structure, we would have been SOL considering we left our pop-up at home (i.e., always bring your pop-up just in case). At that point, it seemed that luck was with us that day.

Considering the bike was 98% race-ready, we breezed through sign-in and tech and had time to get everything unloaded and ready before the riders meeting. Well, I guess lugnut unloaded everything and let me bask in my "rider's glory" however ridiculous that prospect seemed to me.

A note of clarification here, most track day companies offering NRS certification combine their NRS with a normal track day (otherwise it would be prohibitively expensive) and you must abide by all of the track day rules in addition to the NRS rules as laid out by the AFM representatives present at the track. Hence, you must go through all of the track day processes before you get down to NRS business.

Moto411 Race Bike: ready for licensing!

After we arrived, signed in, got teched, and attended the rider meeting, our NRS classroom session began at 9am. Many of the attendees were clearly ansty. While the rest of the track day goers went out to hit the circuit, we were stuck in the classroom. Remembering why we were here allowed us to keep our focus despite the distraction. The classroom session takes about 2 hours and covers only the most basic rules and protocols. At the end of the classroom session, you must pass a test of roughly 25-30 questions. If you don't pass this test, they should take away your license to breed much less race. Regardless, I'm glad they have some sort of test before they let people loose in the pits and on the track.

After the classroom session, they give you an orange belt to wear the remainder of the day, split you up into groups of three or four, assign you to an evaluator and get you out on the track.

The Orange Belt

Before I go any further, let's talk about the orange belt. First, I'm not the fittest of all people and wearing a bright orange belt around the part of my body with the largest circumference proved most unflattering. Second, that orange belt is on you because your behavior is being assessed for the remainder of the day—all your behavior. Even after your track evaluator signs off on your track skills, you are given the rest of the day to fail—both on and off the track. Break the pit speed limit—fail. Fall over on your bike anywhere—fail. Get in an argument with someone in the pits—fail. I didn't anticipate doing anything "common sense stupid," but things can happen and wearing that orange belt reminded me off that fact every time I took a breath.

On-Track Evaluation

The actual on-track evaluation was pretty simple. During one of the track day's "fast group" sessions, the evaluator leads the group around the track once before the first licensee takes the lead for a lap. Then, the next in line takes the lead for the subsequent lap, etc. The point is not to go as fast as you can (in fact, you're told specifically not to do so), the point is to keep the group together so the evaluator can assess a rider's technical skill and ability. Given that, the pace was comfortable even for me. If everything goes well and without incident, you're back in within 5-6 laps. The Evaluator will come talk to you, let you know whether you passed or failed and, if they're nice, offer some pointers. I found the last part especially helpful. My evaluator easily singled out my weakness (staying on some kind of consistent line) and gave me some helpful tips. He then stuck around to answer my endless string of questions and worked with me to help me improve.

Oh The Humanity!

So, that was it right? I passed the paper test and I passed the on-track evaluation. The only thing left to do was wait until the end of the day for the mandatory practice starts. Now we could just sit in our chairs for 2 hours and we'd be set. Well, I just paid for a track day and it was only 2pm. But, if we tried to get in more track time, there was the chance something could go horribly wrong. Any self-respecting rider knows what the right answer is—get back out on the track dammit!

You have to continue wearing the orange belt as a reminder not to do doing anything too foolish and that in and of itself was nerve-racking. Regardless, I needed the track time. So there I was, back on the track, getting faster in each corner on every lap. Although I was improving, there were plenty of faster bikes out there; each one passing me at predictable, if not down right courteous parts of the track. For example, coming down the hill on the back part of Thunder Hill is one of my favorite places to pass slower riders. Coming down the hill from 9 to 10 lets build up your speed, even on a 600, and most track day riders brake far too early for 10—which, although you're coming downhill into it, is on-camber and you can carry all sorts of speed and "creative" lines. All of this makes it easy to pass slower riders without spooking them and that's exactly where a particularly fast Buell passed me. Given that one of my weaknesses is my race line, I seem to speed up when following faster riders (at least until I lose sight of them) and through 10 and into 11 I was right on his ass. Well, the torquey Buell laid the throttle on a little too thick exiting tight turn 11 and low-sided mere inches in from of me. For a split second, I watched the rider and bike scrape along the ground—clearly okay minus some scrapes and sparks—before I realized I should probably be watching the track. I snapped my eyes back and luckily steered around the wreck. This was perhaps my best lesson of the day.

The rest of my laps that day were thankfully uneventful and, when I pulled in after my last couple laps, I felt relieved despite the orange belt still being around my waist. I was looking forward to the practice starts and heading home with my license.

Practice Starts

The practice starts were incredibly fun, but they certainly weren't thrilling. The entire track day, 50 bikes or so, lined up on the start/finish four bikes wide to practice our 2- and 1-minute board procedures. Given there was no prize and no winners, everyone but the front two rows had to keep it toned down to avoid any incidents. The race was only to the first corner and everyone had to form a single-file line before the apex to avoid confrontation (and being thrown off the track or, in the case of NRS riders, failed). I was about halfway back in the pack and my goal was to gain at least one row per start while being controlled and courteous. I did make up about a row or more per start, but never really got to see what the old F4i could do considering my mid-pack position.

Conclusion

How fun was that? What a great day. I wasn't on the track as much as I would prefer and any day starting at 4am is too long, but man did it feel good going home with some sense of accomplishment. If you're a track day regular, I recommend the experience of getting licensed if only for bragging rights (but only to those who haven't been through the experience and don't know how easy it is). I know this isn't first grade, but getting some sort of certificate still feels good no matter how old you are.

Yup, definitely a novice!

We would like to take a minute and thank our "sponsors": Moto411.com, Big Pussy Racing and Bog Bros Serf Shop. Anytime you support one of these brands, you support us and our quest to build this site into an evermore useful source of unbiased information and reporting.

"Sponsors":

Thursday, February 08, 2007

Review: GP Suspension

Quality: +++++(5 out of 5)
Functionality: +++++(5 out of 5)
Appearance: ++++-(4 out of 5)
Value: +++++(5 out of 5)
Overall: +++++(5 out of 5)
Pros:
  • Cutting edge technology
  • Race tested
  • Quality workmanship
  • Good service
  • High value (compared to what else is out there)
Cons:
  • Limited locations (you can go to Oregon or check their race schedule)
  • No bling? (I took one point off in "Appearance" because I know some of you need that visual reassurance of your superiority—shame on you)

Introduction

The first thing we change when we get new bikes is the suspension. Pure and simple, no other modification gives better return on the dollar than having someone fit your bike's suspension and geometry to your body and riding style. Most motorcycles are shipped with a standard suspension setup that works sufficiently for a wide range of possible riders. But, when you start pushing your machine past leisurely riding, the difference between stock and properly-tuned is night and day.

We struck out to find the best suspension we could. Not the most expensive, or most popular, or most prestigious, or the one that would look the best in the parking lot. No, we were looking for the one that would work.

Initial Findings

We found many vendors who offer a variety of motorcycle suspension parts and services, but we quickly learned that merely buying new parts was a good way to spend money with little or negative return. Aftermarket suspension components aren't cheap, and if they're mismatched or not tuned properly, they may actually do more harm than good.1 To that end, we wanted a custom setup—similar to what is provided to racers—and we wanted it at a reasonable price.

Naturally, we decided to ask around the AMA pits. Understandably, most factory teams and some other well-funded teams have their own devoted in-house suspension people. But, for those that didn't, a few names consistently came up. One of those names was GP Suspension.

In Their Own Words

If you take a moment to peruse the GP Suspension website, you'll probably find yourself in the products section. Now, I'm not going to claim I know much of anything about suspension and why one product works better than another, but I will say that I liked what I didn't see. I didn't see a laundry list of part numbers accompanied by "buy it now" buttons. After all, we were looking for later braking, quicker turn-in, more corner speed, better traction, etc.—and I've never seen a "shopping cart" that can deliver any of those things.

Now, this does have a perceived downside. Everyone I know, myself included, enjoys the convenience of clicking their mouse and having their needs fulfilled—but as we would find out later, no such thing exists when it comes to motorcycle suspension. You should be wary of anyone who promises you immediate suspension gratification through a website or store-shelf.

Third Party Validation

Don't believe us (we don't). Ask some real motorcycle riders/journalists. Before we committed our suspension bits to GP Suspension, we checked the literature. We found a 2005 article by Sport Rider Magazine's "roving senior editor Trevitt" as he tested "the latest aftermarket suspension technology from GP Suspension." The write-up can be found here.

Our Experience

We were immediately impressed by GP Suspension's approach—they didn't try and up-sell us on superfluous expensive products. They wanted to make our suspension work. For example, and this may actually hurt them as far as getting their word out, they spend most of their money on R&D versus marketing. They work directly with Öhlins and Penske to ensure that they are on the cutting edge of suspension technology. They seem reluctant to promote any component based on anything other than performance. For those who only want gold and chrome, you need not apply. If you want the best of the best, get in line—GP Suspension's reputation for shaving seconds off lap times has made them a busy bunch.

Their services range from simple adjustments of current/stock suspensions to respringing and reworking your suspension with their proprietary valving kits and needles to full race-ready proprietary Supersport Race Cartridges. They are also an authorized dealer and service center for both Penske and Öhlins.

Images shamelessly stolen from GP Suspension:

I was tempted to go for the Supersport Race Cartridges, but after a reality check, I realized I wasn't good enough to really appreciate them (yet). Plus, that realization saved me some much needed cash and Mr. Trevitt had been nice enough to cover the racing cartridges in his review. I had GP Suspension rework my stock Showa forks with their valving kits, compression needles and new "hefty" springs for my less-than-sexy-in-leathers self. For the rear, I got a Penske shock reworked to GP Suspension standards with (another) "hefty" spring. The only ascetic difference I saw on my forks was the sticker. Everything fit right back on the bike easily. The Penske shock did add a bit of visible status enhancement though, and I must admit that I felt kind of good about that (shame on me).

Forks and shock:

When I made the order, they asked for crucial information such as height, weight, bike model, etc. Using that data, they try and preset the components they send back to you. But the bike won't truly be set up until you get them installed and have the preload, compression, damping, etc. adjusted properly. Even before I had the final tweaking done, I noticed a huge difference over my stock setup. However, once I started pushing the bike, the "wavy line" on the edge of my rear tire and accompanying feeling of unease when leaned over indicated that more needed to be done. (That specific problem was solved with a few clicks of compression.)

Once I met up with GP Suspension at a local event and had them make the final adjustments, things were good to go. I've never been happier with my bike's handling. (For the most part, any reputable suspension tuner should be able to get you "closer to good" in making some of these final adjustments.)

Conclusion

Wow! I never knew I could ride this well. In a large part to my suspension, I have mustered the courage to try racing this year. Thus far we've had a very good experience with GP Suspension. In our research we found a few other outfits and tuners on our coast that had very positive reputations and, although we have not used their products, you can contact us for our list. Wether or not you go with GP Suspension, I recommend every rider to spend their customization money on suspension first—and with stock exhausts becoming more ascetically tolerable on some bikes, this may be easier to justify. I know it's tempting to replace your exhaust first, but remember to look for the GP Suspension stickers on that bike with stock exhaust passing you in the corner.

1. Mail-order and internet retailers tend to be the cheapest source of parts. We found that motorcycle suspension is an exception. Although we were able to save a few dollars by buying a new shock online, we blew through those savings (and then some) getting it resprung because it didn't come with the right spring. Additionally, Ebay is a risky proposition. If the part is even usable (by the way, the term "mint" should mean this but it has an entirely different and deceptive meaning on Ebay), you're likely to need to invest hours just in cleaning effort. Furthermore, not only are you likely to need new springs, but the parts are often mistreated and need to be completely gutted to be brought back to spec. Learn from our mistakes and do yourself a favor: spend the extra $50 and buy your parts from your tuner. You will reap the rewards 100 fold.

Wednesday, February 07, 2007

The Racing Experience

Why We're Racing

Here at Moto411 we've decided to field a race bike in California's AFM Race Series. Why? We feel that to best test the equipment we review and to reassure our readers that we really can ride decently, we should race. Additionally, since we're new to the racing experience, we will also provide insights and reviews regarding the entire racing process and what it requires from start to, hopefully, finish.

Plus, who wouldn't want to race? This gives us a great excuse.

What We're Racing

The bike is a 2001 Honda CBR600 F4i. Certainly not the latest technology, but it's in great mechanical shape and many parts are available for the bike.

Moto411 Race Bike:

Moto411 Race Bike:

When We're Racing

We aren't going to race every round this year—perhaps only 4 or 5 races at the tracks closest to us. We will have schedule updates when they become available. As much as we encourage you to come by and say hello (mention you read this on Moto411.com and get some free stickers), don't expect to see us leading any packs or winning any races—not this year anyway. We will have a yellow "rookie" number plate and we plan to use it. This year I will adopt the name Slowie McSlowerson and report on our AFM racing progress and the things we learn and any tips we have for newbies coming after us.

"Sponsors"

We would like to take a minute and thank our "sponsors": Moto411.com, Big Pussy Racing and Bog Bros Serf Shop. Anytime you support one of these brands, you support us and our quest to build this site into an ever more useful source of honest information and reporting.

"Sponsors":