Moto411, Moto 411
Showing posts with label part. Show all posts

Sunday, July 01, 2007

Part Review: Motovation "No-Cut" Frame Sliders

Quality: ++++-(4 out of 5)
Functionality: +++--(3 out of 5)
Appearance: ++++-(4 out of 5)
Value: ++---(2 out of 5)
Overall: +++--(3 out of 5)
Pros:
  • excellent fit & finish
  • easy installation
  • no bodywork modification required
Cons:
  • expensive
  • prices on replacement parts are insulting
  • no-cut bracket causes fairing damage on impact
  • sales staff hard to reach to answer questions

Introduction

Anyone who's crashed, downed, dropped, or otherwise abused a motorcycle in the past at some point considers purchasing frame sliders. It is useful to remind even the most "seasoned" of us that frame sliders are called frame sliders (and not "engine cover sliders", "fairing sliders" or "muffler sliders") for a reason: they are not meant to protect anything in earnest except for the frame. That being said, one tends to incur much less damage to one's engine covers and fairings in a low-side with frame sliders than without them. However, if you're considering the possibility of a crash while wanting to preserve the newness of your stock fairings, then I suggest removing them and keeping them in the garage, no matter how many frame sliders you own.1

Impression

My initial impression when I ordered these suckers was, "they'd better be darn good," since I paid about US$220 for my set (frame sliders, clutch slider and swing-arm spools/sliders). I will say that they met those expectations, but didn't exceed them. Don't get me wrong, they are quite nice. They are made of high-quality materials with a good attention to detail. The designers even went so far as to taper the left-side frame slider so that it wouldn't require it's own bracket, but could still be mounted without cutting the fairings. To my knowledge, Motovation is one of the few companies to do this (TSR is another).

Installation

Installation was fairly obvious. The only thing to note is that the torque specs on the 2005 YZF-R6 engine bolts is fairly low. The right-side no-cut bracket mounts to the frame via a single bolt and there is not much keeping the bracket from articulating on that mount point.

To be fair almost everyone's designs are similar in this regard. I have seen one (and only one) maker of frame sliders who actually makes no-cut mounting brackets with two mounting points for the bracket, and a third for the slider. I wish I could recall who that is, but I can't as of this writing.

Mmm, sliders:

Use

Normally, I don't like to down my bike just to test a product, but this seemed an appropriate occasion, so we went to dump at Streets Of Willow to see if these sliders would perform as well as they look. I picked the right side, since there was more to damage (exhaust and all) and it would give an opportunity to test out the clutch slider as well.2

Ooo, that's gotta hurt:

Clutch slider (turned upwards):

After executing a textbook low-side, I had plenty of data to evaluate the sliders. As you can see, the sliders did their job and held up quite nicely. As predicted, the right frame slider did rotate on the engine mount point and was crushed right into the fairing. The fairing lost. Luckily, I had my fiberglass track fairings on at the time (which seemed prudent given where I was at the time), so a repair wouldn't be that difficult.

Back on the track at Thunder Hill after "testing" the sliders (and replacing the exhaust can); note the crack in the fairing below the frame slider:

When I purchased the sliders, Motovation had not yet made replacement parts available for purchase. They constantly ignored my e-mails and phone calls to replace my rashed parts. Perhaps this was because they knew they were eventually going to make extra spools and things easy to purchase via their website.

Well, they finally did, and I have to say I was astonished at the cost of a replacement spool. I was already somewhat put off by the cost of the slider kits to begin with, but this was ridiculous. They wanted US$45 for a right-side replacement spool and another US$65 for a replacement clutch slider!

Conclusion

I liked how the Motovation sliders held up in a crash, but I never expected them not to. They looked great, but their cost was high and got even higher post-crash. I especially didn't like the fact that I would be spending more in replacement parts than what most other makers charge for entire sets. And, although not many of us like to crash or think about it too much, I ultimately decided to sell what was left of the Motovation sliders and try a different (less expensive) brand which wouldn't leave me high and dry after my next...uh..."incident".

1. bigpuss is up to two sets on his F4i.

2. What lugnut means to say is that he is an idiot and was lucky enough to have any frame sliders when he decided to throw the bike into a right-hander while trying to trail brake like he was Noriyuki Haga.

Thursday, February 08, 2007

Review: GP Suspension

Quality: +++++(5 out of 5)
Functionality: +++++(5 out of 5)
Appearance: ++++-(4 out of 5)
Value: +++++(5 out of 5)
Overall: +++++(5 out of 5)
Pros:
  • Cutting edge technology
  • Race tested
  • Quality workmanship
  • Good service
  • High value (compared to what else is out there)
Cons:
  • Limited locations (you can go to Oregon or check their race schedule)
  • No bling? (I took one point off in "Appearance" because I know some of you need that visual reassurance of your superiority—shame on you)

Introduction

The first thing we change when we get new bikes is the suspension. Pure and simple, no other modification gives better return on the dollar than having someone fit your bike's suspension and geometry to your body and riding style. Most motorcycles are shipped with a standard suspension setup that works sufficiently for a wide range of possible riders. But, when you start pushing your machine past leisurely riding, the difference between stock and properly-tuned is night and day.

We struck out to find the best suspension we could. Not the most expensive, or most popular, or most prestigious, or the one that would look the best in the parking lot. No, we were looking for the one that would work.

Initial Findings

We found many vendors who offer a variety of motorcycle suspension parts and services, but we quickly learned that merely buying new parts was a good way to spend money with little or negative return. Aftermarket suspension components aren't cheap, and if they're mismatched or not tuned properly, they may actually do more harm than good.1 To that end, we wanted a custom setup—similar to what is provided to racers—and we wanted it at a reasonable price.

Naturally, we decided to ask around the AMA pits. Understandably, most factory teams and some other well-funded teams have their own devoted in-house suspension people. But, for those that didn't, a few names consistently came up. One of those names was GP Suspension.

In Their Own Words

If you take a moment to peruse the GP Suspension website, you'll probably find yourself in the products section. Now, I'm not going to claim I know much of anything about suspension and why one product works better than another, but I will say that I liked what I didn't see. I didn't see a laundry list of part numbers accompanied by "buy it now" buttons. After all, we were looking for later braking, quicker turn-in, more corner speed, better traction, etc.—and I've never seen a "shopping cart" that can deliver any of those things.

Now, this does have a perceived downside. Everyone I know, myself included, enjoys the convenience of clicking their mouse and having their needs fulfilled—but as we would find out later, no such thing exists when it comes to motorcycle suspension. You should be wary of anyone who promises you immediate suspension gratification through a website or store-shelf.

Third Party Validation

Don't believe us (we don't). Ask some real motorcycle riders/journalists. Before we committed our suspension bits to GP Suspension, we checked the literature. We found a 2005 article by Sport Rider Magazine's "roving senior editor Trevitt" as he tested "the latest aftermarket suspension technology from GP Suspension." The write-up can be found here.

Our Experience

We were immediately impressed by GP Suspension's approach—they didn't try and up-sell us on superfluous expensive products. They wanted to make our suspension work. For example, and this may actually hurt them as far as getting their word out, they spend most of their money on R&D versus marketing. They work directly with Öhlins and Penske to ensure that they are on the cutting edge of suspension technology. They seem reluctant to promote any component based on anything other than performance. For those who only want gold and chrome, you need not apply. If you want the best of the best, get in line—GP Suspension's reputation for shaving seconds off lap times has made them a busy bunch.

Their services range from simple adjustments of current/stock suspensions to respringing and reworking your suspension with their proprietary valving kits and needles to full race-ready proprietary Supersport Race Cartridges. They are also an authorized dealer and service center for both Penske and Öhlins.

Images shamelessly stolen from GP Suspension:

I was tempted to go for the Supersport Race Cartridges, but after a reality check, I realized I wasn't good enough to really appreciate them (yet). Plus, that realization saved me some much needed cash and Mr. Trevitt had been nice enough to cover the racing cartridges in his review. I had GP Suspension rework my stock Showa forks with their valving kits, compression needles and new "hefty" springs for my less-than-sexy-in-leathers self. For the rear, I got a Penske shock reworked to GP Suspension standards with (another) "hefty" spring. The only ascetic difference I saw on my forks was the sticker. Everything fit right back on the bike easily. The Penske shock did add a bit of visible status enhancement though, and I must admit that I felt kind of good about that (shame on me).

Forks and shock:

When I made the order, they asked for crucial information such as height, weight, bike model, etc. Using that data, they try and preset the components they send back to you. But the bike won't truly be set up until you get them installed and have the preload, compression, damping, etc. adjusted properly. Even before I had the final tweaking done, I noticed a huge difference over my stock setup. However, once I started pushing the bike, the "wavy line" on the edge of my rear tire and accompanying feeling of unease when leaned over indicated that more needed to be done. (That specific problem was solved with a few clicks of compression.)

Once I met up with GP Suspension at a local event and had them make the final adjustments, things were good to go. I've never been happier with my bike's handling. (For the most part, any reputable suspension tuner should be able to get you "closer to good" in making some of these final adjustments.)

Conclusion

Wow! I never knew I could ride this well. In a large part to my suspension, I have mustered the courage to try racing this year. Thus far we've had a very good experience with GP Suspension. In our research we found a few other outfits and tuners on our coast that had very positive reputations and, although we have not used their products, you can contact us for our list. Wether or not you go with GP Suspension, I recommend every rider to spend their customization money on suspension first—and with stock exhausts becoming more ascetically tolerable on some bikes, this may be easier to justify. I know it's tempting to replace your exhaust first, but remember to look for the GP Suspension stickers on that bike with stock exhaust passing you in the corner.

1. Mail-order and internet retailers tend to be the cheapest source of parts. We found that motorcycle suspension is an exception. Although we were able to save a few dollars by buying a new shock online, we blew through those savings (and then some) getting it resprung because it didn't come with the right spring. Additionally, Ebay is a risky proposition. If the part is even usable (by the way, the term "mint" should mean this but it has an entirely different and deceptive meaning on Ebay), you're likely to need to invest hours just in cleaning effort. Furthermore, not only are you likely to need new springs, but the parts are often mistreated and need to be completely gutted to be brought back to spec. Learn from our mistakes and do yourself a favor: spend the extra $50 and buy your parts from your tuner. You will reap the rewards 100 fold.

Wednesday, November 15, 2006

Part Review: ProGrip 717 Dual Compound SuperBike Grips

Quality: ++++-(4 out of 5)
Functionality: ++++-(4 out of 5)
Appearance: +++--(3 out of 5)
Value: ++++-(4 out of 5)
Overall: ++++-(4 out of 5)
Pros:
  • what vibration?
  • huge selection
  • ProGrip website lists grip lengths(!)
Cons:
  • ProGrip website is somewhat terse on other details (open-ended vs. close ended)
  • some styles are somewhat poseur-esque (that may be a positive for some of you)

Buy ProGrip grips at Amazon.com.

Introduction

Still wanting more from my previous attempt to find decent aftermarket grips, I decided to give ProGrip a try.

Appearance-wise, ProGrips are probably the antithesis of the Renthals. At the time of this writing, ProGrip has over 50 distinct styles utilizing single-, double- or even triple-rubber compounds in seven different categories (covering everything from jet skis to scooters). Due to the huge selection, and since I was ordering these online, this review is as much about my online shopping experience as it is about the grips themselves.

I started at the ProGrip website, which is a pretty daunting place. I had no idea their product offering was so vast. The website has multiple menus, sub-menus and sub-sub-menus, but, since I knew exactly what I was looking for, it was only moderately difficult to navigate to the motorbike grips section.1

To keep things simple, I limited myself to their "SUPER BK" section. Ultimately, I decided on the 717s partially because the grip pattern was similar to the Renthals (and I liked how those performed in that area) and also that they were among those most likely to fit my 2005 YZF-R6. The fact that they were the least obnoxious didn't hurt (I ordered the subtle black-gray color scheme).

Impression

Right away, I noticed a difference between the quality and substance of the ProGrips compared to the Renthals. They were definitely thicker and somewhat more supple. The black-gray theme was not nearly as offensive as I thought it would be based on the website pictures.

Installation

Since I had already removed my stock grips when I installed the Renthals (and since I didn't use grip glue), installation was a non-event. After I removed the safety wire, the Renthals slipped right off with a little compressed air and the 717s went right on with a little isopropyl. I applied new safety wire, waited a few hours for the isopropyl to evaporate, and I was good to go.2

Use

I have to say that, after my first hour-long ride with the ProGrips, I was very pleased. While the grips did transfer some vibration, it wasn't debilitating. Furthermore, they seemed just as grippy as the Renthals—which was the Renthals' one redeeming factor.

The true test was still to come. An hour-long road ride might be comparable to 20 minutes on the track, much less an entire day there. Seeing if the ProGrips provided continued comfort under more extreme riding conditions was the perfect excuse for a track test!

After giving them a spin at Thunderhill, I can honestly say that they did a job damping vibrations while providing comfortable grip, good throttle control, and just the right amount of front-end feedback. I didn't do a back-to-back comparison with the Renthals and my stock grips (which would have been the best method for comparison), but at this point, I almost don't feel it's necessary since this is the first time I've been clearly content with my grips.

Conclusion

I should acknowledge that evaluating motorcycle grips is highly subjective and rider personalities vary significantly. I've known motorcrossers-turned-roadracers who insist on using off-road grips on their race bikes. That's probably why it makes sense for ProGrip to offer as many styles as it does.

That being said, I think I'm finally happy with my own grip situation. Also, since I ride on the road as well as the track, reducing vibration while maintaining feel is important to me, but a competent racer using them exclusively for the track might have different demands (more feedback, lower cost of replacement, etc.). What I can tell you is that the ProGrips cost was pretty similar to that of the Renthals, but because they performed so much better for me, I feel like I got more bang for my buck. I would definitely recommend giving them a try.

1. I have to take this opportunity to express my dissatisfaction the ProGrip website. It relied too heavily on JavaScript and, personally, I hate it when JavaScript/Flash is a necessary part of navigation. One of the most detrimental side-effects of this approach is that I, as a consumer, can't copy the URL from my browser and e-mail it to bigpuss for a second opinion.

With website design, as a general rule, keep it simple. An elegant solution won't make a consumer think too much. Read Don't Make Me Think: A Common Sense Approach to Web Usability, and remember (as Mr. T would say) KISS: Keep It Simple Sucka.

2. bigpuss actually has perfected an approach using only compressed air to pull grips off and slide them on. Mastery of this approach allows almost immediate gratification since there is no isopropyl that must evaporate. I encourage you to experiment and find your own best method.

Monday, October 16, 2006

Part Review: CBR600 F4i Windscreens - Puig vs. Zero Gravity

Buy Puig windscreens at Amazon.com.

Introduction

It was less than 48 hours until we were supposed to be at the track and I needed a new windscreen. Okay, I wanted a new windscreen. Mine was scratched and old and, although I'm typically not one for vanity, the track day was mostly made up of Ducatis and I was bringing a Honda. I stopped at my local dealership to pick up a windscreen. (Normally I would order one online, but time was short.) They said they could order me a Zero Gravity windscreen and it would arrive the following morning, in time for my track day. Being familiar with Zero Gravity's product, I gave them the green light and headed to another dealership to cover my bases—just in case the "following morning" was actually next week. The alternate dealership had a Puig Racing windscreen in stock. Figuring a windscreen in hand was worth two the morning of the track day, I purchased the Puig as well.

I admit I wasn't familiar with Puig products, but seeing the windscreen in person before buying it put me at ease. The windscreen seemed well made, robust, and I liked the "bubble" form of the Racing series. I'm not a small person by any means and when you're on a 5-year-old 600 constantly going up against liter-bikes on the straightaway, any aerodynamic advantage—whether perceived or real—can help.

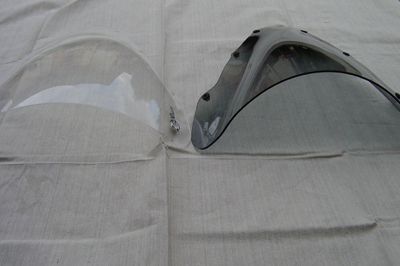
Puig (tinted) vs. Zero Gravity (clear):

Impression

Both were roughly $70 and both were easy to install. Each seem of good quality. However, I immediatly noticed a difference in material thickness betwen the two as can be seen below.

The Puig is clearly thicker:

Additionally, I liked the "bubble" on the Puig Racing windscreen. In all fairness, Zero Gravity does offer three different styles: the SR, Double Bubble, and Sport Touring. The "Double Bubble" is akin to Puig's Racing series and the "SR" is akin to Puig's "Standard" series. Given that the Puig screen is made with thicker material and you get the "bubble" for the same price as Zero Gravity's standard SR model, I was happier with my Puig purchase.


Installation

Installation was simple, straightforward, and the same on both screens.

Use

Figuring the Zero Gravity would be very similar to my stock windscreen, I used the Puig at the track. Overall, it performed very well...how can a windscreen really perform badly unless it cracks or flies off? I really liked the racing bubble profile. I'm sure it was a total placebo, but I couldn't attribute making time on 1000cc Ducatis on the straightaway to anything else as I know it wasn't rider skill.

It's worth noting that I have no long-term results yet. I don't know how each responds to prolonged sun exposure, repeated cleaning, abuse at track days, or a crash. I will update my review when I start getting that kind of data.

Conclusion

If I had to return one of the windscreens, I would return the Zero Gravity. Of course I will continue to use both and log future observations.

Part Review: Gilles Rearsets 2001 CBR600 F4i

Quality: ++++-(4 out of 5)
Functionality: ++++-(4 out of 5)
Appearance: +++++(5 out of 5)
Value: +++--(3 out of 5)
Overall: ++++-(4 out of 5)
Pros:
  • Solves stock F4i rearset "problem"
  • Great feel, good grip, smooth shifting
  • Excellent craftsmanship
  • Are they not hot?
  • Replacement parts sold individually
Cons:
  • Not cheap
  • Not cheap at all

Buy Gilles rearsets at Amazon.com.

Introduction

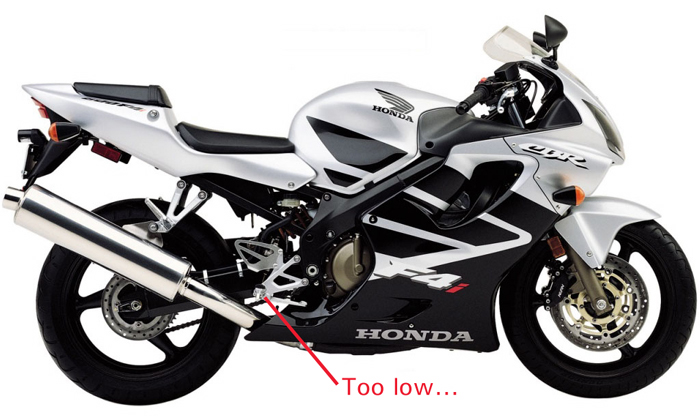
Anyone who owns a Honda CBR600 F4i knows the bike, save the seat, is extremely comfortable given its above average handling capabilities. That comfort comes at a cost though; for any aggressive riding, the foot pegs are far too low.

Seen here, the stock F4i rearsets are too low:

This can lead to a serious medical condition known as Toeis Nomoreis. If Toeis Nomoreis is allowed to progress, the cost in footwear alone can be exorbitant.

A bad case of Toeis Nomoreis:

The only thing that could solve my problem was a pair of aftermarket rearsets. I took lugnut's advice, read his review and ordered some Gilles rearsets.

Impression

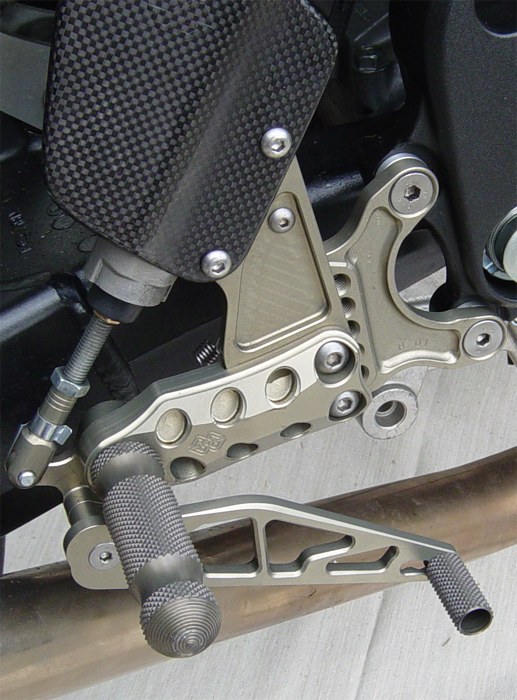
Wow! lugnut was right. The rearsets continued to impress me from the time I got the box until long after I hit the road. Lucky for lugnut everything he reported was dead on, as I know where he lives. I liked the black ones lugnut chose, but I went with the "titanium" color to match my bike.

Right side:

Left side:

Installation

Installation was simple and straightforward. Unlike with lugnut's R6, the F4i rearsets did not require any creative shift linkages. However, when purchasing the rearsets, I had to explicitly decide between standard or inverted shifting.

Use

Having sat on lugnut's bike when he had his Vortex rearsets, I was worried about grip on an aftermarket foot peg. I was pleasantly surprised with the Gilles pegs. Fantastic grip, smooth shifting and, best of all, my Toeis Nomoreis has been cured.

Conclusion

True, they are expensive, but find me some quality aftermarket rearsets that aren't. Given the price, I could have lived without them if my stock rearsets weren't so low. But, due to the problems with my boots, these were a necessity. For the F4i, I think the Gilles rearsets represent a good solution for riders encountering similar issues.

Sunday, August 27, 2006

Part Review: Renthal Road Race Grips

Quality: +++--(3 out of 5)
Functionality: ++---(2 out of 5)
Appearance: ++---(2 out of 5)
Value: +++--(3 out of 5)
Overall: ++---(2 out of 5)
Pros:
  • grippy
  • if you buy these, you get exactly what Jamie Hacking gets
Cons:
  • might as well be painted on based on how much vibration they communicate
  • use limited to one crash only

Introduction

The stock grips on most sportbikes are notoriously hard and slippery. The manufacturer of your particular model may be dealing with vibration issues in the 8,000 - 10,000 RPM range for a third straight year, but unfortunately, you don't get a free upgrade when (if!) they finally address the problem. Stock grips don't do much to insulate you from the idiosyncratic oscillations of all those moving parts underneath you. Aftermarket grips are often an inexpensive way to incrementally improve ergonomics and put some distance between your hands and your drive train.

I decided to replace the stock grips on my 2005 R6 with a pair of Renthal medium-compound Road Race grips. My decision was based partly on my noticing that (soft-compound) Renthals were used on the Graves Motorsports bikes (and I figured Graves and Jamie Hacking knew what they were doing). I opted for the medium compound in the hopes that they would hold up a little better (I wasn't interested in replacing them after every track day).

Impression

The grips were a little thinner than the stock ones on my R6. The diamond grip looked...well...grippy. There's nothing that really stood out about Renthal's Road Race grips, and I liked that. I didn't care if they were cute or if they had three-color, multi-compound inlays; I just wanted them to work.

Yup, it's a grip:

Installation

The hardest part of installing aftermarket grips is getting the stock ones off. They are usually glued on by a professional gluer who more often than not really knows what he or she is doing. I find the best results for stock grip removal usually come from an iterative use of a small flat-head screwdriver, and air compressor (optional, but very helpful), some silicone spray and a lot of elbow grease.

First, I slip the screwdriver underneath stock grip and try to pry the rubber away from the bar (or throttle). I'll sweep around and around until I get about 0.5" in all the way around. Then I will use compressed air to try to separate the grip further. Between attempts with the air, I'll shove the straw from my silicone spray as far in as I can and apply a liberal amount of the spray. Then I wrench the grip back and forth with my hands to see how much of the glue I can break loose. I keep repeating this until I can pull the grip off. The silicone is a necessity (for me anyway), since it eliminates me fighting with the natural friction between the rubber and the bar and makes it easier to apply my efforts solely to the glue. bigpuss says that in a pinch, you can use WD-40 instead of silicone spray, but I find that silicone spray is easier to clean off if you ever intend to use the grips again (you do not want them to be lubed with anything that won't evaporate quickly when they go on).

I should mention that whenever I put grips on, I don't use grip glue. I find that if I clean the inner portion of the grip and use some isopropyl (rubbing alcohol) as temporary lubricant to get them into position, safety wire and the grips' natural friction is plenty to keep them from moving around. Your mileage may vary however.

The packaging is a little more exciting:

Use

Right away I was impressed by the control. These grips were definitely a lot grippier than stock and I didn't have to squeeze nearly as much to be able to twist the throttle.

Almost immediately thereafter, however, I noticed an odd buzzing sensation in my fingers and hands. After about an hour on the rode, my hands were numb (which was unusual for me). The '05 R6 tended to exhibit some "interesting" vibrations inside of certain RPM ranges. Unfortunately, these seemed to be where I spent most of my time on the road. This may have been exaggerated by the fact that I had replaced my stock bar end weights with aftermarket Delron ones (which weight far less).

On the track I hardly noticed the vibration at all, but I was only out for (at most) 20 minutes at a time. I wouldn't be able to guarantee I would be as happy after 45 minutes.

I had an...uh...opportunity to see how they held up in a crash when I low-sided at Willow Springs and I have to say these are pretty delicate in the face of adversity in the form of tarmac and gravel. The crash-side grip was torn away from the throttle which was doubly impressive considering the end of the bar was protected by my bar ends. All I can say is that when you crash, everything seems to come in contact with dirt and rocks in one way or another.

Conclusion

I can't say I'd get these again. While they certainly improved my grip, they put me a little too close to my engine vibrations for my tastes. That might be improved by moving to the softer compound, but I'm fearful that those will hold up even less well. For now, I'll keep looking for something better.

Sunday, July 09, 2006

Part Review: Gilles Rearsets

Quality:++++-(4 out of 5)
Functionality:++++-(4 out of 5)
Appearance:+++++(5 out of 5)
Value:++---(2 out of 5)
Overall:++++-(4 out of 5)
Pros:
  • very purty
  • extremely durable
  • oh so pretty
  • lots of adjustability
  • did we mention they look good?
Cons:
  • not exactly cheap
  • replacement parts are pricey
  • shift linkage is non-standard (on the 03-05 R6)

Buy Gilles rearsets at Amazon.com.

Introduction

After having some mediocre experiences with Vortex rearsets on my 2005 YZF-R6, I decided to investigate alternatives. Still being interested in ergonomic adjustability, I was naturally attracted to Gilles (okay, so I was attracted to Gilles because they looked good and 58cycle carried them for about US$100 below list, but after seeing they were adjustable too, I decided to give them a shot).

Impression

I was impressed as soon as I opened the box (which was pretty too, I might add). First, the rearsets arrived almost completely assembled (except for the shift rod) and were attached to a display rod much like those one would see in display cases at shops and trade shows). Second, even in the understated black annodized finish, these were just plain nice to look at. I spent about fifteen minutes holding them up and admiring them before even looking at the instructions.

One surprise for me were the footpegs. All the photos I had seen were shot at a downward angle showing only the tops of the pegs. I was under the impression that these were solid cylinders, when in fact they had less material then I realized. This caused some concern as I wondered how they would hold up in a crash.

Also, the diamond-knurled pattern was sharp. While I was sure this aided with grip, I couldn't help but notice that one could not touch these to anything fibrous (like a t-shirt or napkin) without having it claim a few bits for its own. Everything stuck to these things. I didn't want to imagine what would happen if I dragged a bare knuckle or two across them.

Installation

Most of the literature that came with the rearsets was in German. I don't speak German, much less read it, but that was okay since what little English there was covered any questions I had regarding installation. The nice part was the instructions had just enough pictures which were much more valuable than words for this kind of thing anyway.

You might be wondering why one would need instructions to install rearsets. After all, doesn't one just remove the stock ones and bolt on the aftermarket ones? In most cases that is true, but the Gilles rearsets for the 2005 YZF-R6 have a non-standard, dual-rod shifter linkage. While this looks like an overly-creative way to allow for both standard and GP shift patterns without messing with the shift arm, it probably also has the added benefit of allowing Gilles to keep more standard components—like the pedals and mounts—and to make adapter parts for each bike.

The only downside to this approach that I can see is it doesn't make for very much space on the aft side of the frame for a quick-shifter. I haven't attempted to install one using these rearsets, but I would imagine that it limits one's options. Any quick shifter that can be installed on the forward side of the shift rod is probably still okay.

The rearsets also came with a mount for the stock brake light switch as well as a spring to both activate the stock switch, as well as act as an—albeit somewhat weak—return spring for the brake lever.

Adjusting the foot position is fairly straightforward and requires the removal of two bolts on either side, provided one stays within the same column of adjustment. However, to keep the same pedal angle when one strays outside of that column, one might have to reposition where the intermediate shift rod attaches to the pedal, or—at the very least—make a less dramatic adjustment using the main shift rod.

I noticed when I used the adjustment position that is lowest and furthest back, the brake pedal came within a millimeter or two of my exhaust pipe. It didn't touch, but the distance made me a little nervous. Grabbing (with gloved hands, of course) and tugging on the pegs showed very little flex, and it took quite a bit of force to get the pedal to come in contact with the pipe.

Use

On both the street and the track, these were quite nice. My feet stayed planted and I could always tell where the ends of the pegs were. Shifting didn't feel strange even with the change in linkage. There was no rear brake drag and the pedals were easy to operate. I had absolutely no complaints while riding.

Conclusion

There are no two ways around the fact that these are expensive. Finding a place that sells them at a discount helps, but it is still quite a bit of money to spend. That being said, if you're in the market for rearsets because you're dragging your stock pegs or want better ergonomics, I would highly recommend considering these. You'll get one of the best rearset products currently in production. Not to mention—as some of my tosser friends might say—they look the absolute business!


Update (2006-07-09)

After low-siding at Willow Springs, I can say I am even more impressed by these rearsets. I slid on my right side for about 30 feet across the track surface, and then another 20-30 feet in the run-off area and the right-side rearset looked almost new when I picked the bike up again. The only damage was on the foot peg which—despite losing several millimeters of material on then end—was still straight.

The damage incurred by my right-side foot peg during a low-side at Willow Springs:

A close-up:

I checked around and nearly every retailer who sold Gilles rearsets also sold replacement parts, including new footpegs. A new footpeg was about US$28, but I decided against replacing it, since there wasn't anything functionally wrong with the one I still had.

My post-crash clutch-protector...:

...and right-side frame-slider (both turned upwards) for perspective:

Saturday, June 17, 2006

Part Review: Vortex Rearsets

Quality:++---(2 out of 5)
Functionality:++---(2 out of 5)
Appearance:+++--(3 out of 5)
Value:+++--(3 out of 5)
Overall:++- --(2 out of 5)
Pros:
  • cheap(er than most other rearsets)
  • lots of adjustability
Cons:
  • susceptible to damage in a tip-over
  • replacement parts are pricey
  • can't feel the ends of the pegs
  • no brake light switch
  • tends to drag the rear brake

Introduction

One of the problems with some stock rearsets is that they tend to drag at full lean. For a neophite rider like myself, this can be quite unnerving (especially if they catch). I decided to replace the stock set on my 2005 YZF-R6 with something a little more track-friendly. One of the features I desired in aftermarket rearsets was adjustability (probably because I'm not good enough to know exactly where I want my feet to be).

I also tend to be pretty price conscious. Apparently there is a severe shortage of materials and manufacturing options in the motorcycle components market, since I can get an entire 5.5 HP, 2220 Watt generator for less than what I would pay for a few ounces of milled (and maybe annodized) aluminum and some bolts.

Given my options, I was drawn to the Vortex rearsets for their apparent adjustability and the fact that they were about US$100 cheaper than similar offerings.

Impression

Vortex products usually leave me feeling mildly blasé: they're nothing spectacular, but not junk either. These rearsets were no exception.

Installation

Installation was fairly obvious. One thing that was strange to me was the replacement of the stock shift rod. Use of the Vortex rod was necessary since these rearsets use a different thread size on the shift pedal. I'm not sure why they didn't just make it the same size thread and use the stock rod, but I'm sure they have their reasons.

For laughs, I initially installed them with a GP shift pattern. I had never used that pattern before and I wanted to see how difficult it was to change the configuration back and forth with these rearsets. It was relatively simple and required relocating the shift rod outside the frame and swapping the orientation of the shift arm. No additional parts were needed.

Installation of these rearsets necessitates the removal of the rear brake light switch. I wasn't too worried about this since I almost never use my rear brake exclusively, but the fact that Vortex did not make a solution available (even as an optional component) was irksome. Another troublesome matter was that there was no external spring on the brake pedal. It relied entirely on the rear master cylinder to return to a neutral position.

Setting the footpeg positions were easy and minor adjustments could be made quickly.

Use

Once I got my feet positioned close to where I wanted them, riding up and down my block for the first time was a natural experience (aside from the change in shift pattern).

One thing that was bothersome was the "sponginess" of the rear brake. With no additional spring to return the brake pedal to neutral, the resistance from the master cylinder was not enough on its own and gave me the odd feeling that the brake lever was constantly in a different position every time I went for it. Although this was probably more psychological than anything else, Vortex had no solution, so I spent nearly $30 to order another manufacturer's fix.

A few quick rides told me that a GP shift pattern was not in the cards for me (at least not at this time). Heck, if Mat Mladin can win six AMA Superbike championships with a standard shift pattern, I figure it's good enough for me.

At a track day at Willow Springs, other issues came to light. Although the footpegs were knurled with a small diamond pattern, I had a hard with the feel. As I would attempt to set up for a corner, I would move the ball of my foot back to sit on the rear peg, but often wouldn't quite know exactly where on the peg I was. For a better rider, this may not have been an issue, but for me, this was distracting (especially when my foot would slide off the end).

While in the pits, I had a slight mishap when I grabbed too much front brake while pulling a U-turn to our tent. I lost my balance and dropped my bike on its right side. One of the points to hit was the footpeg. At first, I didn't notice any immediate damage (other than a few very small scuffs from the hard pavement), but when I removed the footpeg for a closer inspection, I noticed the bolt that held it in place was bent. It seemed improbable to me that a small tip-over could have caused this, but I couldn't think of anything else to which to attribute it.

At the end of the track day, I noticed a gritty feel when I tried to shift. I'm not sure how, but apparently dirt had made its way into the bearings on the shift pedal. While I doubted they would seize up right away, I wasn't about to take a chance the next time I went out on the track, so when I got home, I ordered a replacement set. The cost? US$28.84 plus shipping. Ouch! How often was I going to need these?

Conclusion

While I think these are probably adequate for the street, I would think twice about getting these for serious track use. First, don't even think about buying these without also purchasing the Graves return spring (and by the time you make that purchase, you're probably in the ball-park of the cost of a superior product). Second, if you're like me, you're likely to find your self paying attention to your footwork rather than your lines. Third, if you crash, you're probably going to be buying a new set, since it will likely cost less than the required repair. All in all, I can't recommend these even to bargain hunters. I'd say spend the few extra dollars and get yourself something a little more robust and well-designed.


Update (2006-06-17)

Vortex has changed their footpeg design, my guess is as a result of feedback from riders. I have not tried them, but based on the appearance of the changes, I would say they probably address my issues with footpeg feel.

Sunday, April 09, 2006

Part Review: Graves Rear Brake Return Spring

Quality:++---(2 out of 5)
Functionality:+++++(5 out of 5)
Appearance:+++--(3 out of 5)
Value:+----(1 out of 5)
Overall:++- --(2 out of 5)
Pros:
  • gets the job done (period)
Cons:
  • oh-my-god expensive for what you get

Introduction

After installing a set of Vortex rearsets on my 2005 YZF-R6, I was experiencing a problem with the return of the rear brake pedal. I hunted around for a solution and ultimately found Graves Motorsports' rear brake return spring.

Impression

When I opened the bubble mailer to reveal what I had purchased, I actually asked myself aloud, "that's it?" I was tempted to hold the envelope upside down and shake it just to make sure I wasn't missing something, but I wasn't. The package consisted of a packing slip, a spring and a small threaded mounting plate whose diameter was just larger than the spring's. My next question to myself was, "I paid what for this thing?"

The satin titanium-look finish on the plate was nice, but it was clear this was not a precision-milled part. The threaded hole was not centered and the hex end was somewhat lopsided. Maybe I just got a bad one, but it didn't look like much care went into actually making this thing.

Installation

Installation was trivial. No instructions were necessary even without having a photo handy. Just unscrew the master cylinder pedal joint and locking nut, slip on the spring, screw on the spring plate in place of the locking nut and screw the joint back on (pocket the nut in case you ever want to return it to the stock setup). The finish on the plate is almost identical to the finish on the joint, so after it's installed one is tempted to think that these are all stock parts. This led me to wonder why Yamaha doesn't make their rear master cylinder assemblies like this in the first place.

Use

It fixed my probem, clean and simple. My brake pedal now eagerly returned to a neutral position when I relinquished pressure.

Conclusion

I suspect Vortex rearsets aren't the only ones to suffer from this problem (after all, Graves makes rearsets too), so I'm sure there's a demand for this product, but I am severly unimpressed by the cost. That being said, it just works. How many modern devices can we say that about? I say if you need it, get it, unless you can find something cheaper.